Recycling Clay Process
Using recycled clay for my vessels helps keep costs down, but I need to plan the process carefully to stay on schedule. Processing clay takes two days to rehydrate, colour, dry out, and finish. To streamline my practice, I need to allocate specific days for each step and ensure I have various types of clay ready when needed.
To maintain high standards, I will add a step to sieve my hydrated liquid clay. Since our recycled clay bin is accessible to everyone, it often contains impurities like stones and tiny rocks. Sieving the clay before adding colour ensures it is as pure as possible, preventing any debris from interfering with my work and lowering its professionalism. Although this adds more time to my process, I believe it's worth it for the higher quality of the final product.


Making Methods- Slip Casting

While discussing my project with Dina, I considered using slip casting to speed up my production process. This technique would allow me to focus more on details and get my vessels out to the public faster, giving me more time to gather feedback and finalise my work. However, after our conversation, we concluded that slip casting might not be the best approach for me.
Since I haven't experimented much with slip casting, I would spend a significant portion of my project perfecting this technique. Additionally, slip casting clay is very different from the clay I'm accustomed to, requiring extensive experimentation with both the material and the addition of colours, which react differently.
The shapes of my vessels would also necessitate creating at least a three-part mould to capture all the rims and surfaces accurately, which would be quite challenging. Given my confidence and experience with throwing, it seems impractical to change my process. The more I throw, the faster I become, making it the most efficient method for me. Throwing also allows me to maintain the marbled clay surface and the unique details of my vessels.
Practise Vessels
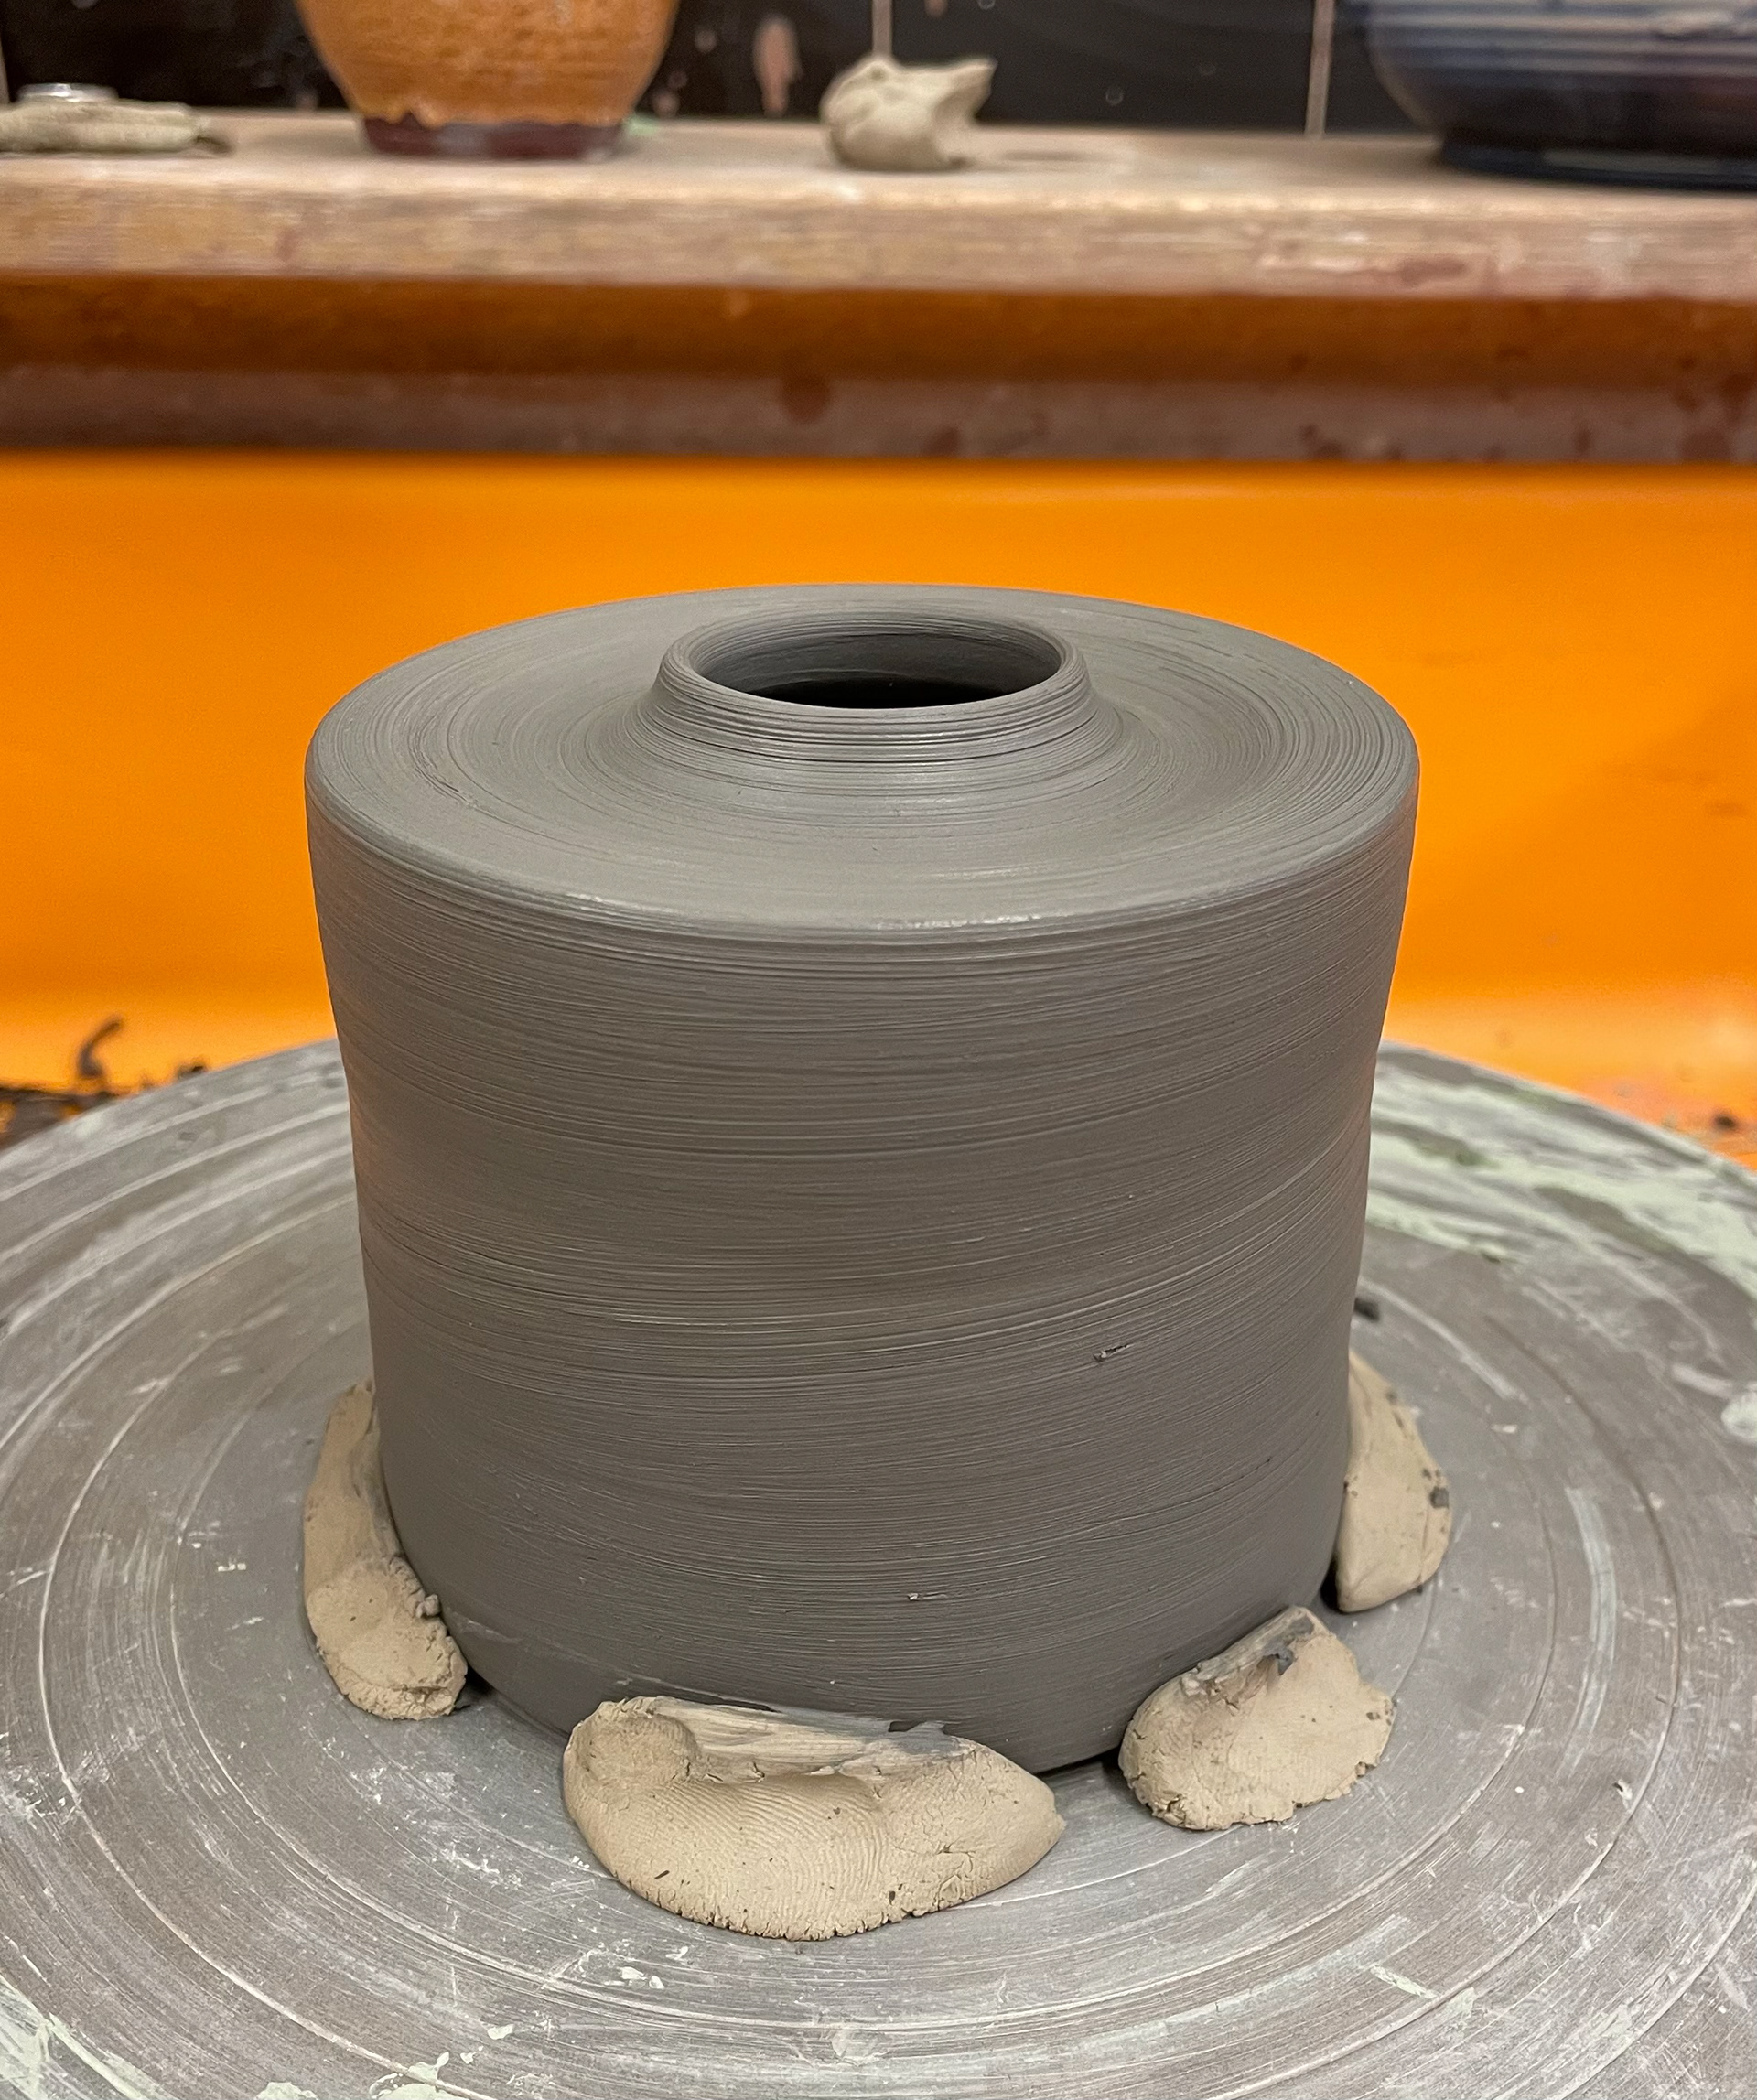
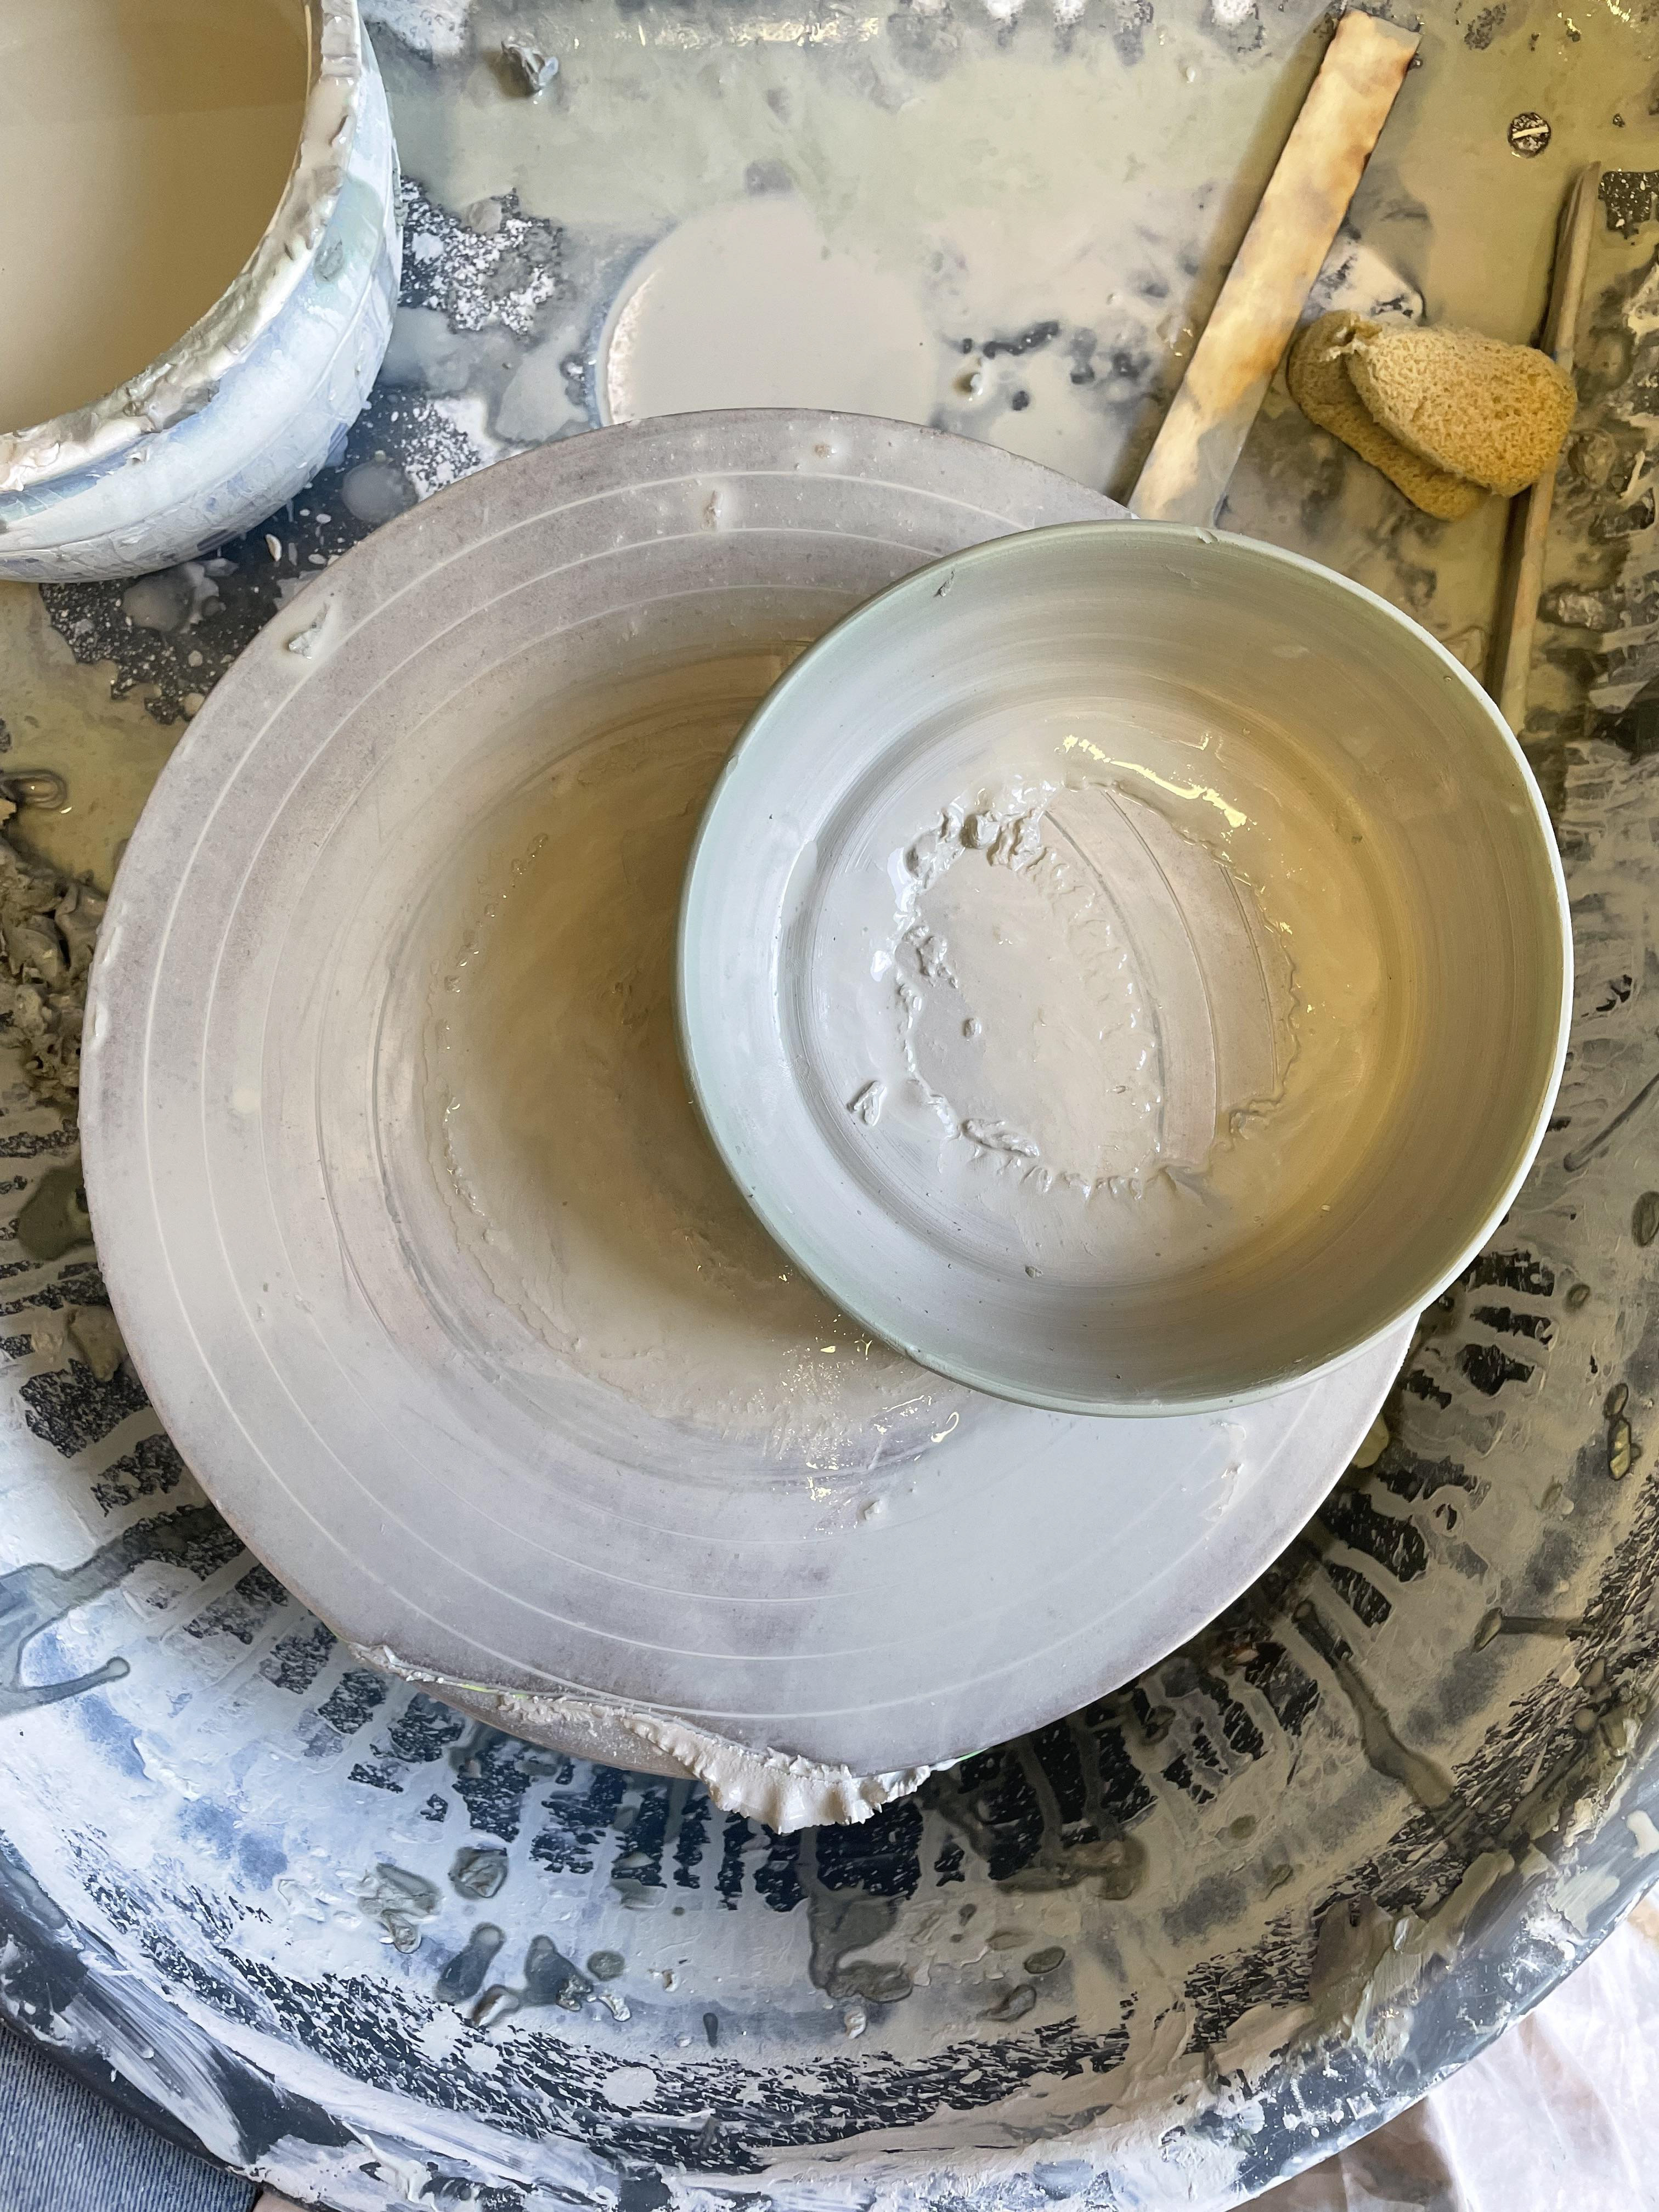
Since I hadn't thrown over the Christmas period, I created these samples to get back into the groove of creating. I didn't plan these vessels, I just wanted to create them intuitively with the materials I had. I used leftover coloured clay from Unit X, reducing my waste. These vessels are made from 500g of clay and thrown in two parts.
While creating these, I tried to throw them in one piece but found it challenging to achieve a clean right-angled top with such a small opening. I was unable to create the forms I wanted. By making these samples, I was able to refine my technique, highlighting steps I needed to focus on, such as joining the two parts. I want to find an effective way to clean and attach them both on the outside and inside.
These samples were perfect starting points for my making process, providing a solid foundation for this project and allowing me to explore the direction I want my work to follow.


Looking at the profiles of my vessels and how I want to develop them, I appreciate the more organic forms they take on after being attached. However, I need to ensure that in future vessels, I am throwing centred and attaching the parts evenly. This will prevent significant layovers that result in uneven profiles. Trimming the centres will help me achieve a more balanced and symmetrical finish.
-Consistent Centring: Ensuring each piece is centred correctly on the wheel to maintain uniformity.
-Even Attachment: Carefully joining the two parts to avoid any misalignment that could affect the vessel's profile.
-Refined Trimming: Trimming the bases and edges to achieve clean, sharp lines and a professional finish.
-Experimentation with Forms: Continuing to explore different shapes and forms to find the most aesthetically pleasing and functional designs.


Reflecting on these vessels, I made them smaller due to the available clay. However, this allowed me to focus on the scale of my vessels. In Unit X, my vessels were larger, around 20 cm each, and I intended to make even bigger vessels. But these samples allowed me to reflect and appreciate the smaller scale.
From these reflections, I will be changing my direction with scale, looking at scaling down. I initially thought that having a larger scale would make the vessels more impressive, eye-catching and enhance the details. However, with a smaller scale, the details don't get lost they become more delicate and intricate.
Although these vessels are very small, around 7-10 cm in height, I want to create slightly larger ones, but still much smaller than my previous project. Many reasons for this make my vessels more convenient for me as the maker and for my audience.
By focusing on a smaller scale, I can create a more extensive collection that is large in its entirety but small and detailed individually. This approach allows me to explore new forms and techniques while maintaining a high level of craftsmanship and detail.
Practise Vessel Two


I wanted to focus more on scale and determine the best proportions for my vessels. For these pieces, I used 600g of clay, slightly more than before, intending to upscale my vessels further. A key consideration in this process was shrinkage, as I had previously been throwing pieces to my ideal shape without accounting for how much they would shrink during firing. As a result, many of my finished vessels turned out much smaller than expected once they came out of the kiln. Moving forward, I need to be more precise in estimating shrinkage rates to ensure my final forms align with my original vision.


Vessel Sizing
Although I expressed a desire to explore larger vessels in Unit X, I now realise that this was more of a personal accomplishment than a practical one. Reflecting on this, I want to shift my focus to creating smaller vessels. Smaller vessels are easier to take and carry away, making them more convenient for my audience.
Additionally, considering the size of people's homes, smaller vessels are more likely to fit into various living spaces, increasing their appeal and accessibility. As a maker, producing smaller vessels allows me to expand my collection more quickly, giving me more time to focus on intricate details.
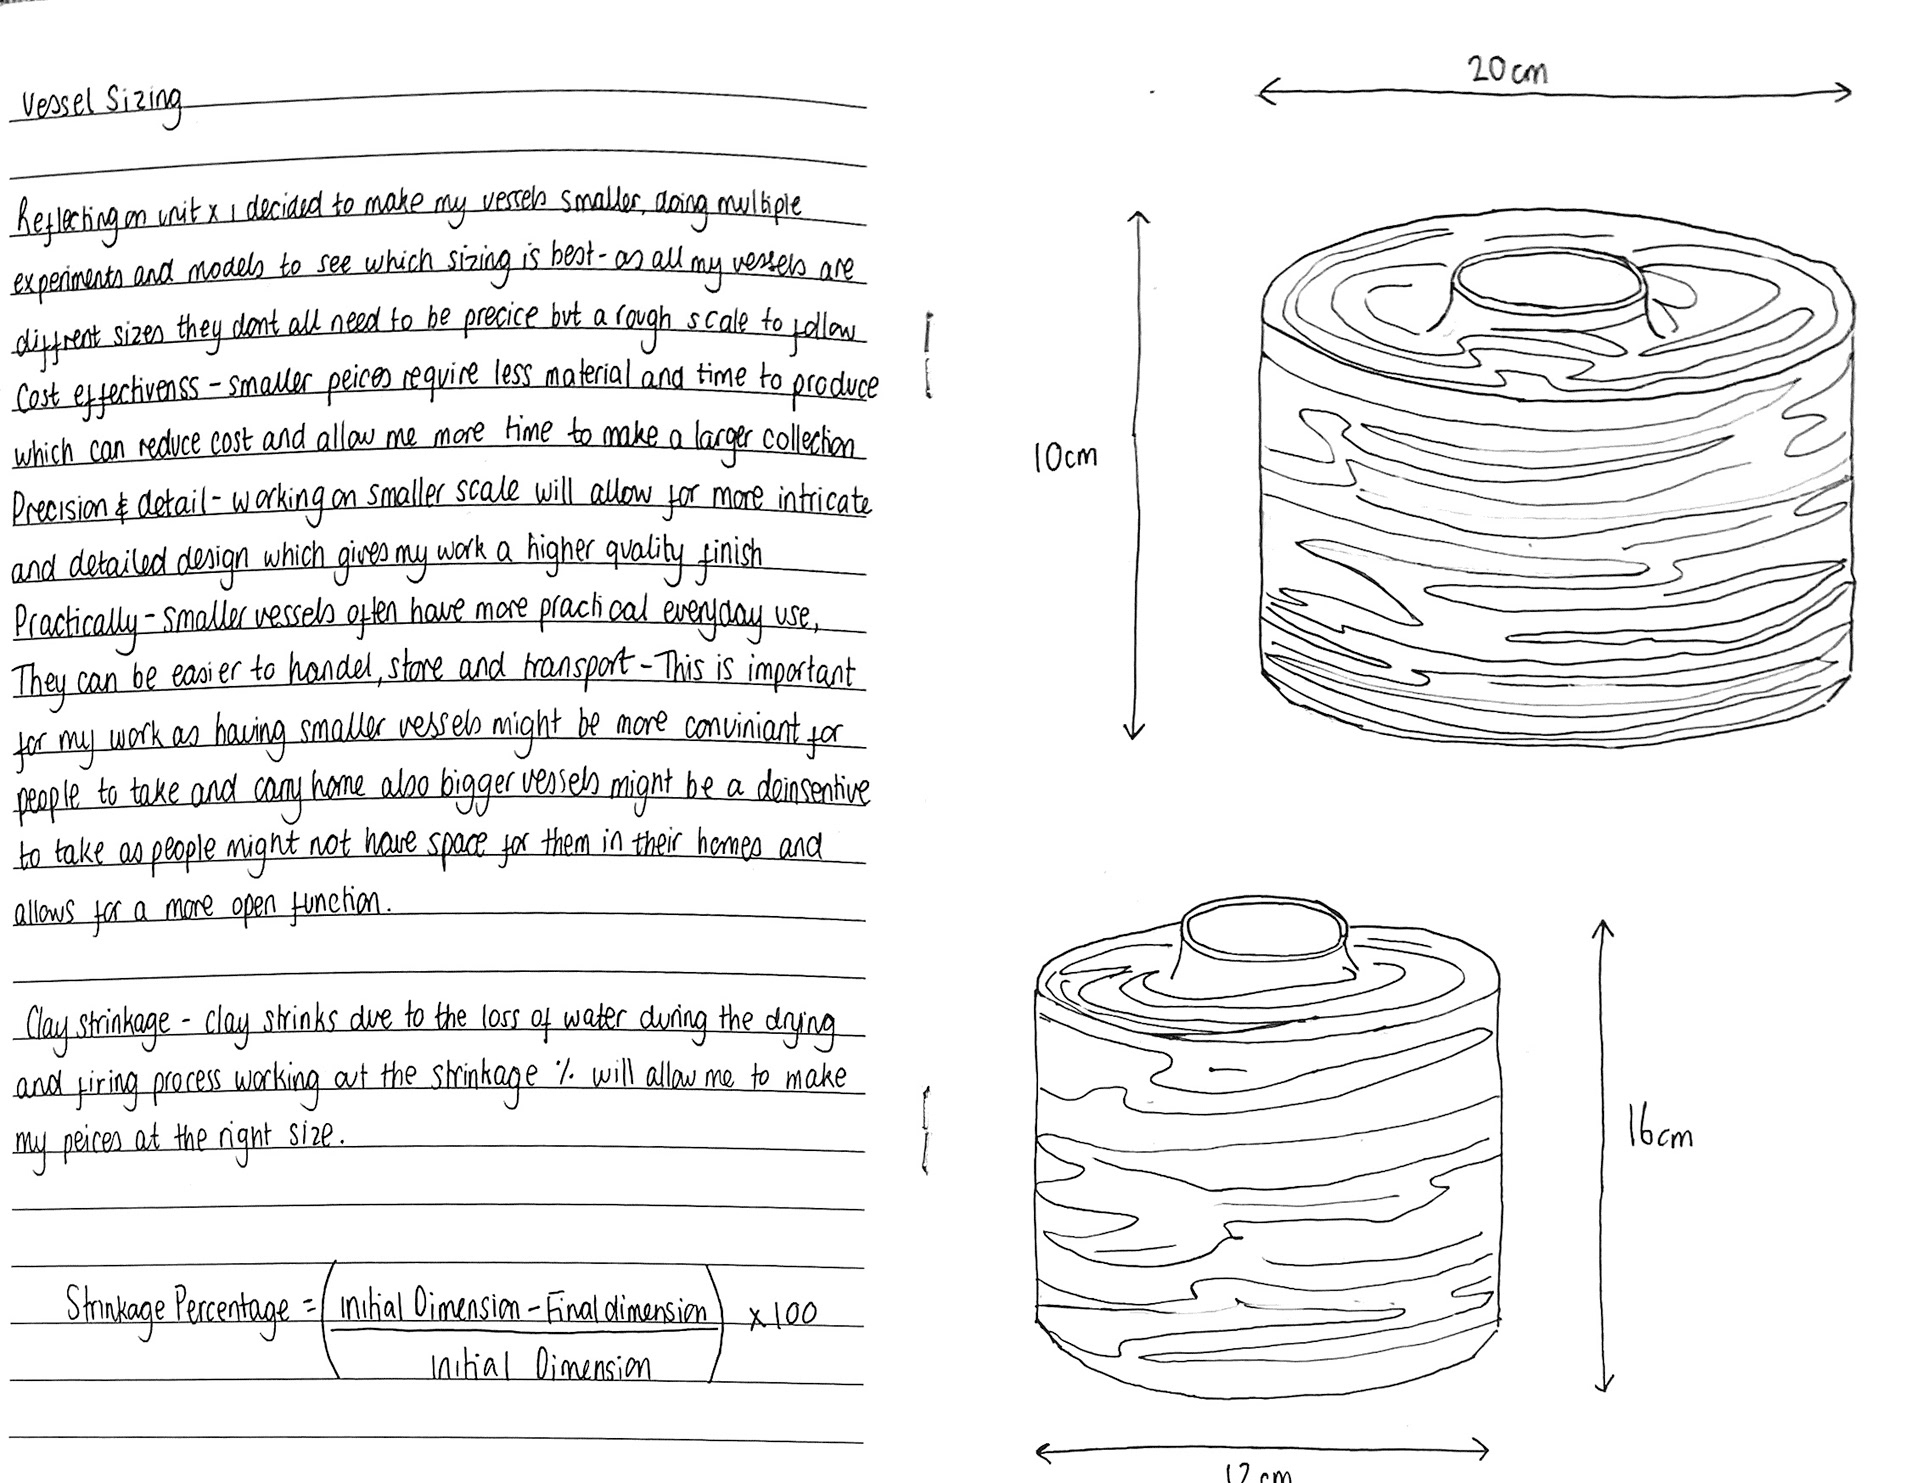
Common shrinkage rates for different types of clay can vary significantly based on their composition and firing temperature. Earthenware typically has a shrinkage rate of 4-8%, making it suitable for decorative pieces and pottery due to its lower firing temperature and less shrinkage. Stoneware, with a 9-13% shrinkage rate, is fired at higher temperatures and is often used for functional ware like dishes and mugs due to its durability. Factors such as clay body composition, firing temperature, particle size, and water content can all affect these shrinkage rates, with higher temperatures and finer particles generally leading to more shrinkage.
Shrinkage Percentage=(Initial Dimension−Final Dimension/ initial Dimension)×100


initial dimension= 12cm Final Dimension=11cm
(12cm-11cm/ 12cm)x 100 = 8.33% strinkage rate


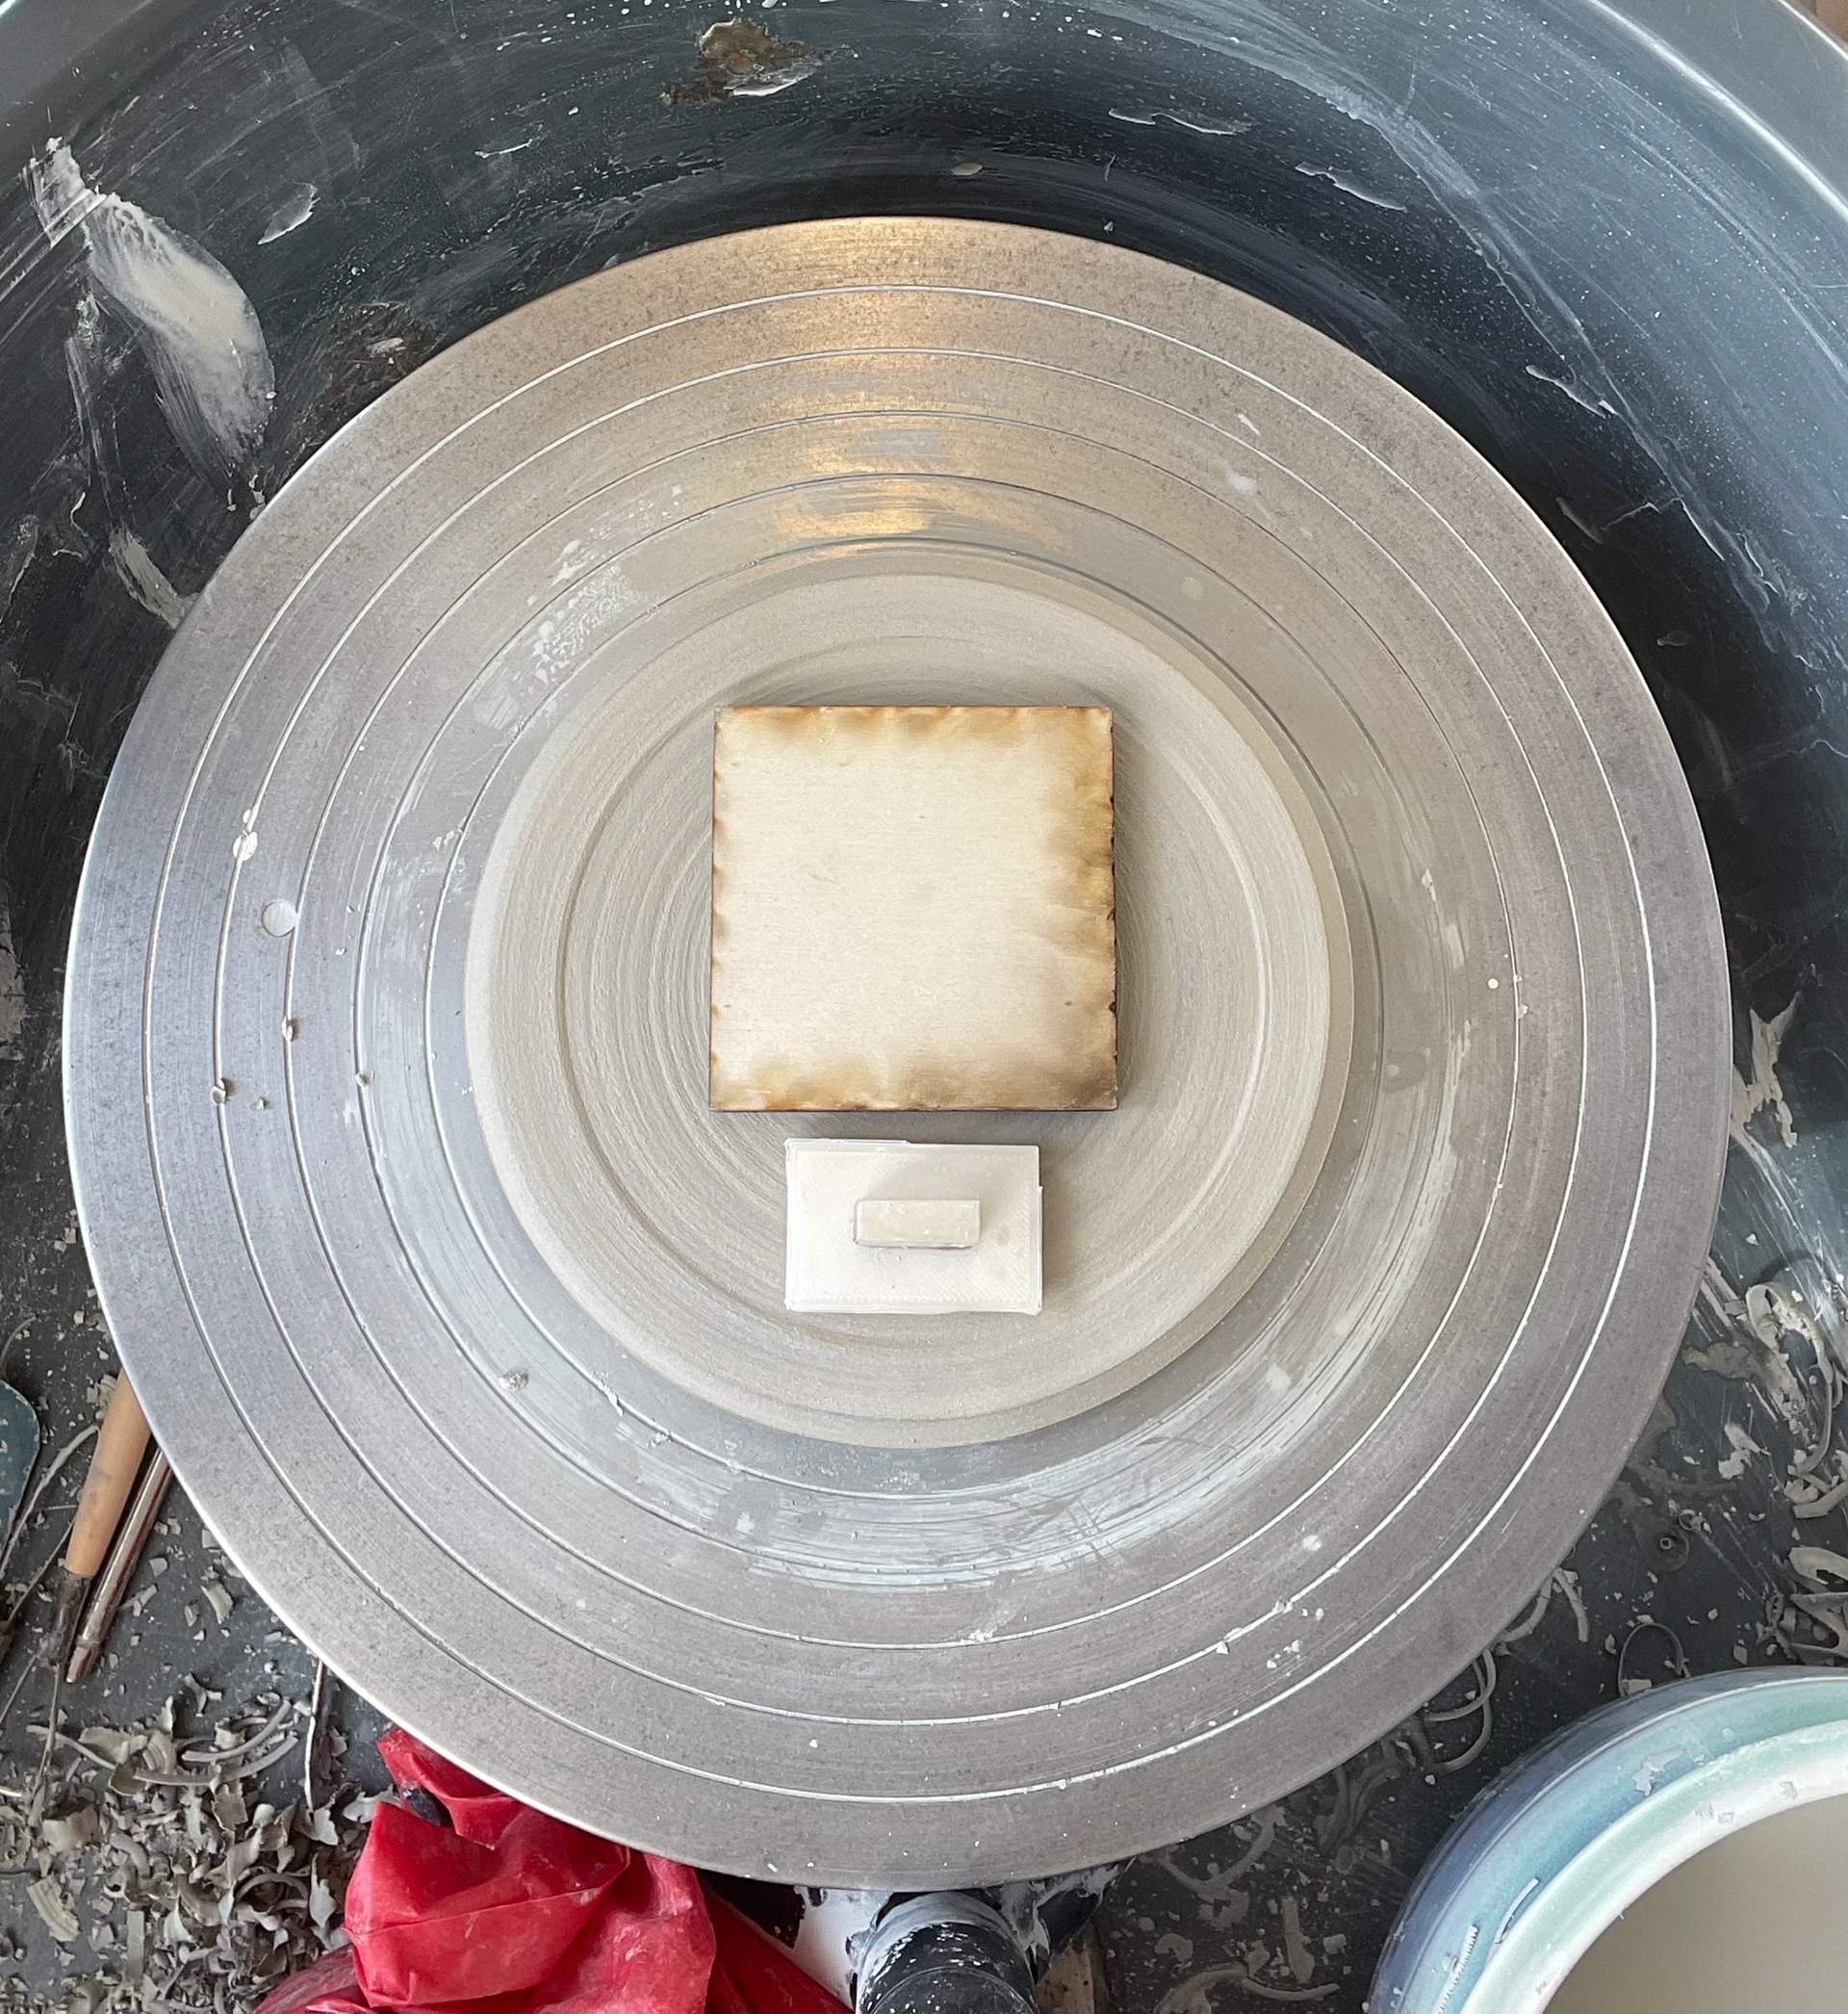
I’ve been experimenting with paper models to visualise the sizing of my vessels before applying the shrinkage rate to ensure they’ll turn out as planned. I designed two different shapes: a wider vessel and a taller vessel.
For the wider vessel, I originally shaped it at 16 cm in width and 9.5 cm in height. After firing, considering a shrinkage rate of 8.33%, its final dimensions would be approximately 14.67 cm wide and 8.71 cm tall. For the taller vessel, I would need to throw it at 13 cm in width and 14 cm in height to achieve the final measurements of approximately 11.92 cm wide and 12.83 cm tall after firing. This aligns closely with the size I’m aiming for.
Vessel 1 Width:
16−(16×0.0833)= 16−1.3328= 14.67cm
Height:
9.5−(9.5×0.0833)=9.5−0.79135= 8.71 cm
vessel 2 Width:
13−(13×0.0833)=13−1.0829= 11.92 cm
Height:
14−(14×0.0833)=14−1.1662≈12.83 cm
Memories Of Home

Basing my artwork on my memories is beneficial to my art practice because it allows me to create deeply personal and meaningful pieces that resonate with both myself and my audience. Memories of places like Brighton and Manchester contribute to my sense of identity, shaping who I am and connecting me to my past. These memories provide emotional connections and comfort, as they are tied to significant life events, personal growth, and the bonds formed with friends, family, and the community. By incorporating these elements into my work, I can explore themes of home, identity, and belonging, creating art that tells a story and evokes a sense of place. Additionally, reflecting on my memories helps me appreciate the foundation they provided and the new experiences and connections I am building. This dual sense of place, with Brighton representing my roots and Manchester symbolising growth, enriches my creative process and allows me to produce work that is both authentic and relatable.
Memories Of Brighton
Incorporating these colours and memories into my work not only adds a personal touch but also helps me connect with the audience on a deeper level. The visual representation of my memories through the colour palette and the marbled clay technique creates a cohesive narrative that ties my past experiences to my current artistic practice. This approach allows me to explore themes of home and sense of place, making my work more meaningful and relatable. My photo memories of Brighton are based on different times, with most of them featuring the beach, which is my comfort place and the setting for many of my memories. The colours of Brighton are hues of blues, whites, and yellows from the sun, and pinks, oranges, and yellows from the sunsets seen on the beach. I think it would be interesting to incorporate the distinct line of the horizon into my work. This line could be created when connecting my two-part vessels together using an orange or yellow clay slip, making a distinct line between the blues in the vessels.

Memories Of Manchester
Going through and finding photos of my memories in Manchester has been a deeply reflective process, allowing me to reminisce on fond moments, such as my first week in the city and pictures of my comfort places. These images are important to my work as they serve as a focal point, grounding my creative process in personal experiences and emotional connections.
By stretching and warping these photos, I was able to decipher a colour palette that reflects the essence of Manchester. The city is characterised by greens, reds, shades of grey, and blue skies. These stretched-out drawings remind me of my vessels, which feature marbled, stretched clay. Using these photos as the basis for my colour palette is the starting point for my work, ensuring that my creations are infused with the spirit and atmosphere of Manchester.

Creating these pieces has made me reflect deeply on the concept of home and what it truly means to me. As I worked through the memories captured in my photos, I realised that home is not just a physical place but a collection of experiences, emotions, and connections that shape my identity. The process of stretching and warping these images to decipher a colour palette and abstract elements has guided me to understand the essence of Manchester and how it has influenced my sense of belonging. This reflection has inspired me to develop my practice further, focusing on the theme of home and exploring its multifaceted nature. By integrating personal memories, emotional connections, and the spirit of the places that have shaped me, I aim to create work that resonates deeply with the concept of home.
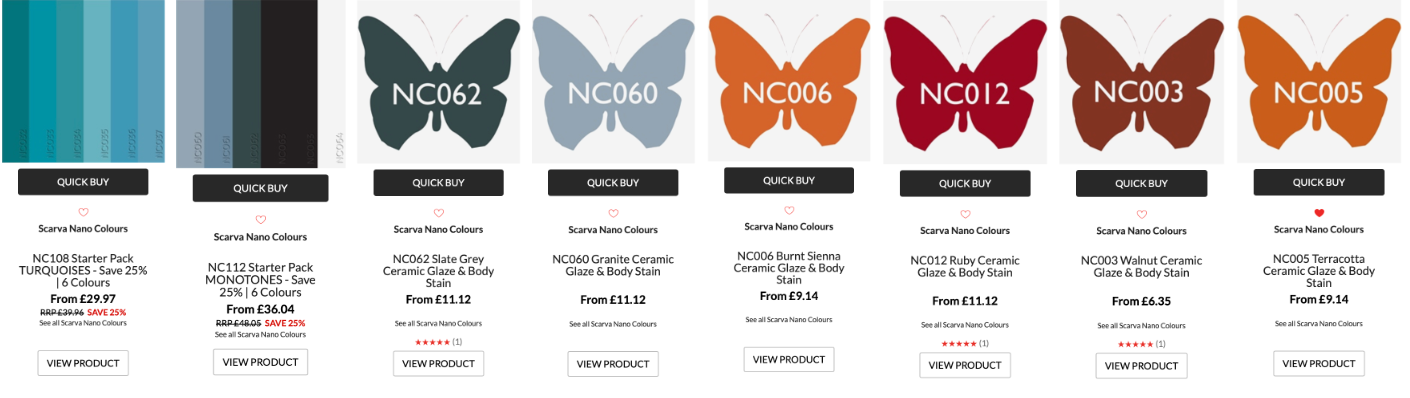
-Colour Palette: Using the colour palette derived from my photos of Brighton and Manchester- greens, reds, shades of grey, and blue skies. These colours can be applied through glazes or stains to evoke the essence of the city and your experiences there.
-Textures and Patterns: Reflect the textures and patterns found in my memories. The wave-like patterns and distortions in my photos reflect in my marbled coloured clay
-Forms and Shapes: This could be inspired by architectural elements, natural forms, or forms found in the city
Narrative Elements: Create a collection of pieces that tell a story about my journey and experiences related to home.

Laser Cutting Qr Codes
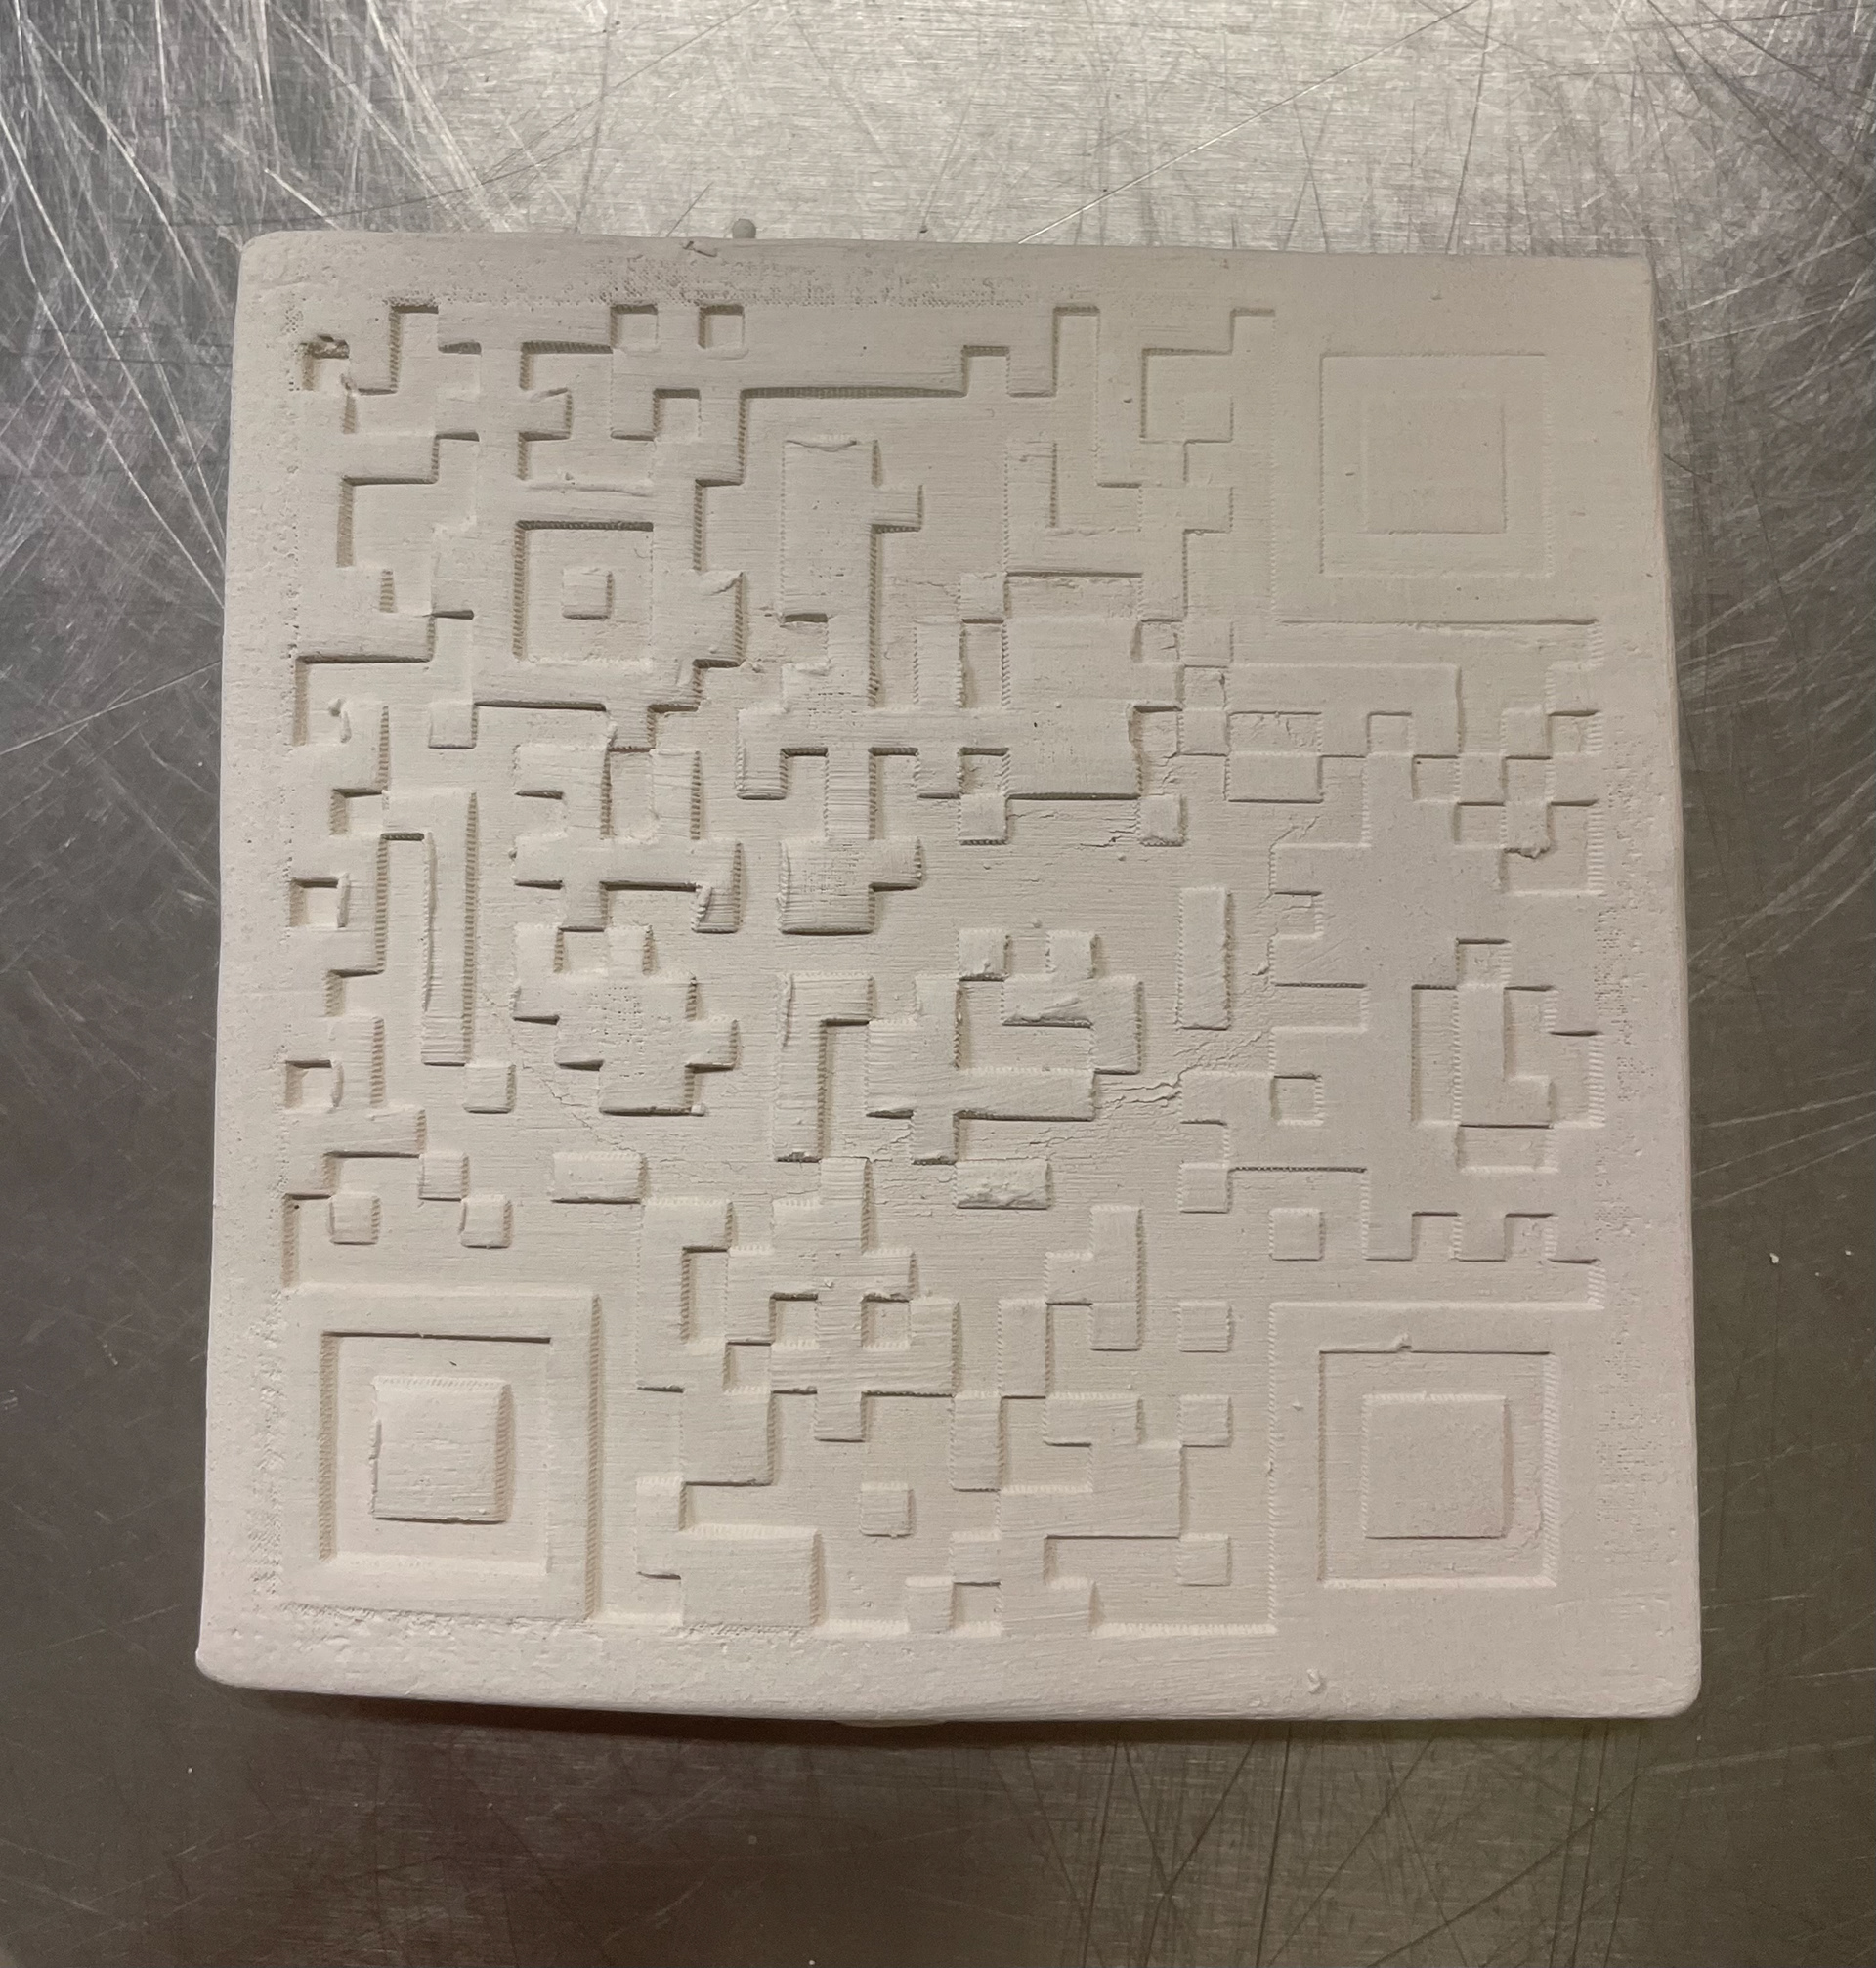
Thinking about methods to create QR codes in my ceramics, I wanted to explore different ways of application that would scan and apply effectively. My initial idea was to create a stamp to either press into my vessels or dip into slip and stamp on. For creating a QR code, I decided to use a laser-cut mould. Since my Linktree already generated a QR code for me, I just needed to upload it to the laser cutting system and prepare it for cutting.
With QR codes, the shapes need to be very precise and perfectly positioned. Initially, I thought of cutting away all the white areas from my codes, but this would leave me with many individual squares to hand place and stamp correctly. Therefore, I decided to laser cut them, embossing the white areas so the black parts of the QR code would be raised when stamped.
I had never used the laser cutter before, so it took some practice to make the template align correctly. With help from the technician, we created a large template for samples. Using scrap plywood is the best material since it doesn't absorb water easily, maintaining its shape. Using scraps also kept my costs down, resulting in a completely free stamp. The laser cutting process took around 30 minutes to complete for a 10x10 cm stamp.


The laser cutting process starts by creating or uploading a design to the laser cutting software. This design will be converted into a G-code, which the laser cutter uses to follow the pattern. Place the material to be cut on the laser cutter's bed. Ensure it is flat and secure to prevent any movement during the cutting process. The laser cutter follows the G-code to move the focused laser beam along the design pattern. The intense heat from the laser melts or burns the material, creating a clean cut. This process allows for precise and intricate designs to be cut with high accuracy and minimal material waste.


For this first experiment, I decided to use the QR code as a stamp to print it on clay. I started by creating clay tiles and letting them reach a leather-hard stage. I then tried two different methods. First, I painted my QR code with a black slip, covering all the raised surfaces. Once the clay was leather-hard, I firmly stamped the QR code onto the tile.
I was unsure if this would work, as the stamp didn't pick up all of the QR code, especially around the edges, and the slip bled a little, creating uneven lines. However, when I tested the QR code, it surprisingly worked and directed me to my Linktree. I was pleased that the process was functional. I let the tile dry, preparing it for firing, and was excited to see if the QR code would still work after firing, as slip can sometimes bleed further when absorbed by the clay.
For the next test, I experimented with using a dark clay body, as most of my vessels will be made with coloured clay. I wanted to see if a dark clay body with a white stamp would work as well. Using the same process, the white slip didn't transfer onto the black slip tile effectively, resulting in a patchy QR code with missing information. This QR code did not scan. I suspect that I used too much black slip without letting it dry properly, causing the white slip to mix with it and create a patchy transfer.
Although the first test worked, I am not satisfied with the stamp's quality. I want to further experiment to achieve clean, sharp lines that add to the professional finish of my work. If I stamped my work like this, it wouldn't be clear what it is, and further instructions would be needed. I need to make my QR codes clean and clear, allowing people to easily access them.
I want to do further tests, stamping a white slip on actual coloured clay to see if this will improve its readability. By experimenting with the black slip as the base, I was thinking I could black slip the bottom of all my vessels and then stamp the white slip on. However, as this experiment didn't work, I think I want to explore stamping white slip directly onto coloured clay for vessels that have a darker base to see if this transfer is more precise. Additionally, I need to reduce the size of the QR code, as the current 10x10 cm size is too large for most of my vessels. By experimenting with a smaller stamp, I can see a more realistic sample of the final product.


The final results, once fired and glazed, showed that although the black slip stamped on ivory stoneware clay still scanned and directed to the intended website, the quality of the stamp did not meet my professional standards. I need to conduct further experiments to make the QR code less patchy and achieve clean, bold lines.
As seen with the white QR stamping, the white slip bled into the black slip. To improve this, I plan to experiment with stamping on coloured clay instead of a coloured slip surface. I hope this will create a clearer distinction between surfaces, resulting in a much cleaner and more scannable QR code.
Although this is a strong start for transferring QR codes onto ceramics, further development is needed to enhance the quality. I also need to consider whether this method is the most effective in terms of time and finish. I don't want the QR codes to appear messy on my work, as this would lower the overall finish of my vessels.
My next process focused on stamping the laser-cut QR code into my clay. This took some practice to perfect, as the clay needed to be level and the stamp had to be pressed in well, especially around the edges, to imprint properly. Although this method worked and the QR code scanned well, I realised that to apply this technique to my vessels, I would need to adjust the thickness of their bases. A good depth in the clay is necessary for a clear stamp.
I want to further experiment with applying this method to my ceramic vessels. Currently, I aim for thin bases to reduce the weight of my vessels, but I may need to reconsider this to achieve a good stamp depth. I also wonder if this method would work as well when the clay is leather-hard, as I would need to trim the base before stamping.
Once the piece was bisque-fired, I added two layers of underglaze to the raised sections of the clay. Since QR codes need distinct colours to separate the squares, I used blue as it was available. However, I wonder how this would change when applied to different coloured body clays.
I will be stamping the bottom of my vessels, so I won't glaze the base. I am curious if the underglaze will react differently without a glaze and if the colour contrast will be sufficient for devices to pick up the QR code. Although the stamp into the clay wasn't even across the tile, once underglaze and filling out the finer lines, it was much easier to read.
While I like this process, I think it needs further development. It is more time-consuming than my first process of slip stamping. Painting each square is labour-intensive and will slow down my production on a project where I am already very time-conscious.


Further QR Testing


I made a new QR code a lot smaller in scale 5x5cm to do further experimenting. I used the laser cutter again as it seemed the best technique to complete my experience. I'm excited to see how these QR tests will change once on my vessel bases which is the next step my sampling needs to go into.

Although a smaller QR code is easier to print and will be the same size on my vessels, I don't think I will continue with this technique due to its inconsistency on professionally finished pieces. The main focus of my work is to have very precise details that are uniform throughout each vessel and the collection, including the QR code. However, stamping the QR code compromises this precision and consistency, as each stamp is unpredictable. If a stamped QR code is unreadable, it serves no purpose and is difficult to remove, requiring me to redo the entire step, which is time-consuming.
Given that the stamping technique is not effective, clean, or precise, I would be better off finding a new method to apply QR codes to my vessels. Using transfers would allow me to achieve clean, readable lines, maintaining the uniformity and professional quality of my work.
Blue Clay
I aimed to create test-thrown vessels using blue clay. I prepared three different clay bodies, each with varying percentages of cobalt oxide. From previous experience, I knew that cobalt doesn't react well in stoneware, often dulling the colour. Therefore, I decided to fire these vessels in an earthenware kiln, making only three vessels.
Each pot was made from 600g of Ivory Stoneware, thrown in two parts, and then joined together. The first pot contained 0.5% cobalt, the second 1% cobalt, and the third 1.5% cobalt. I chose to wedge the oxides into the wet clay instead of using bone-dry Ivory Stoneware. This was a different technique from my usual process, but I wanted to see if it would improve the colour and speed up the process.
As I was wedging the cobalt, I had to add it into the wet clay under an extractor while wearing gloves, as cobalt can be a very reactive oxide. This made the wedging process more difficult. Additionally, I found that I couldn't get the exact amount of oxide into the clay, as some of it transferred onto the wedging bench. These slight variations in the amount of oxide could affect the final colouring.
After firing and glazing the vessels, I noticed streaks of colour where the oxides hadn't been evenly distributed, despite wedging for a long time. This discolouration in the clay body did not meet my standards. I decided that this process wasn't one I wanted to continue, as the results were unsatisfactory.


I wanted to explore different shapes and proportions, experimenting with variations in height and width. I also focused on refining the design of openings and rims on the vessels, testing how subtle changes could impact the overall aesthetic and functionality. Creating vessels with distinct details allows me to refine my preferred finish and improve my skills.
One of my key areas of focus was trimming, ensuring that each vessel maintained a light and portable weight while still retaining enough clay to securely attach and shape a well-defined opening at the top.
Although these pieces contain only small increments of cobalt, it is strong, just a little makes a noticeable change. Looking ahead, I want to further refine my approach to size and shrinkage. I initially based these vessels on my preferred dimensions, but I overlooked how much they would shrink during the drying and firing process. As a result, they turned out much smaller than expected. Moving forward, I need to account for shrinkage by adjusting my measurements accordingly, ensuring that my final pieces match my intended scale.


Fired Blue Clay

Once my vessels had been bisque-fired, I decided to dip-glaze them for efficiency. Typically, I use a spray gun to apply a clear stoneware glaze. However, by taping the rim edge, I was able to achieve a clean rim line, which streamlined the process as I didn't have to clean the base of my vessels and could easily dip them in.
These were the final results of my blue sample clay vessels. You can see the gradient of colour through each vessel, with a more noticeable difference between the first (0.5% cobalt) and the second (1% cobalt) and between the second (1% cobalt) and the third (1.5% cobalt). The gradient is much more subtle in the latter comparison. I like these colours and think they reflect the colours of the Brighton Sea well. I'm excited to see how they look in marbled clay vessels, as colours usually pop out more depending on the other colours they are surrounded by, allowing for a more subtle or drastic contrast.
Looking at the joins, I think they all have pretty seamless connections that don't affect the profile too much, allowing for a more organic vessel body. However, on the middle (1% cobalt) vessel, I don't like the opening I tried out. I think it's too big for the vessel and takes away from its delicate nature. It has a high and broad rim, which detracts from its delicacy. The other openings, being very small, subtle, and curved, suit the vessels much better. I prefer the 1.5% cobalt vessel opening as it stands up without having a large ramp blending into the vessel top, unlike the 0.5% cobalt opening, which has a much more defined peak.


Upon examining the quality of my finished vessels, I noticed some issues that need addressing. In the left photo, there is grit embedded on the vessel surface that, once glazed, has affected the overall appearance. Small details like this need to be identified and corrected, as marks, dents, and dirt significantly impact the final finish and the standard of my work. To avoid such issues, I need to maintain a controlled making environment.
In the right photo, you can see bubbles on the vessel's surface. This is due to an overly thick application of glaze. Since I used the dip glazing method, it was harder to control the thickness of the glaze on my pieces. Although I wanted to test dip glazing for efficiency, it doesn't provide the finish I desire. I need to continue using a glaze spray gun to apply thin, delicate layers of glaze that enhance the finish of my vessels.


I photographed my blue vessels together to compare how well the colours matched. Although the turquoise is a glaze painted on, I thought it might be interesting to test a glaze over a blue vessel. Applying a very thin layer could reveal how it interacts with the surface, as I like the colour and believe it could enhance the cobalt blue clay. Since I have only ever used a clear, shiny glaze, this experiment would give me insight into a new approach.
However, as seen in the photos, the turquoise glaze was far too dominant, overwhelming the vessel entirely. While it worked reasonably well on solid blue clay, it would be too overpowering on a marbled vessel, obscuring the delicate details. Initially, I experimented with this turquoise blue to understand how it coats coloured clay, as I had only ever used clear earthenware glaze. I considered using it sparingly to highlight certain areas, but its coverage was too intense. Since I am working with more than just blue clay, this would require further experimentation with other coloured glazes.
Ultimately, I feel that my pieces are already bold and visually striking due to the marbled clay, and adding an extra glaze layer detracts from the essence of my process. The whole purpose of colouring clay is to integrate the hues naturally rather than relying on a glaze for colour. That is where my real interest lies, the blending of coloured clay itself. Because of this, I will continue using clear shiny glaze, allowing the raw beauty of the marbled clay to remain the focal point
Grey Clay


Exploring grey clay, I wanted to experiment with different amounts of oxides to achieve lighter shades of grey, despite having previous recipes. I created three different mixtures:
1 -A combination of 1% manganese and red iron with 0.5% cobalt.
2 -A mixture of 0.5% manganese and red iron with 0.25% cobalt.
3 -A blend of 1.5% manganese and red iron with 1% cobalt.
I made two different cones with each mixture to see if they reacted better in stoneware or earthenware firing.


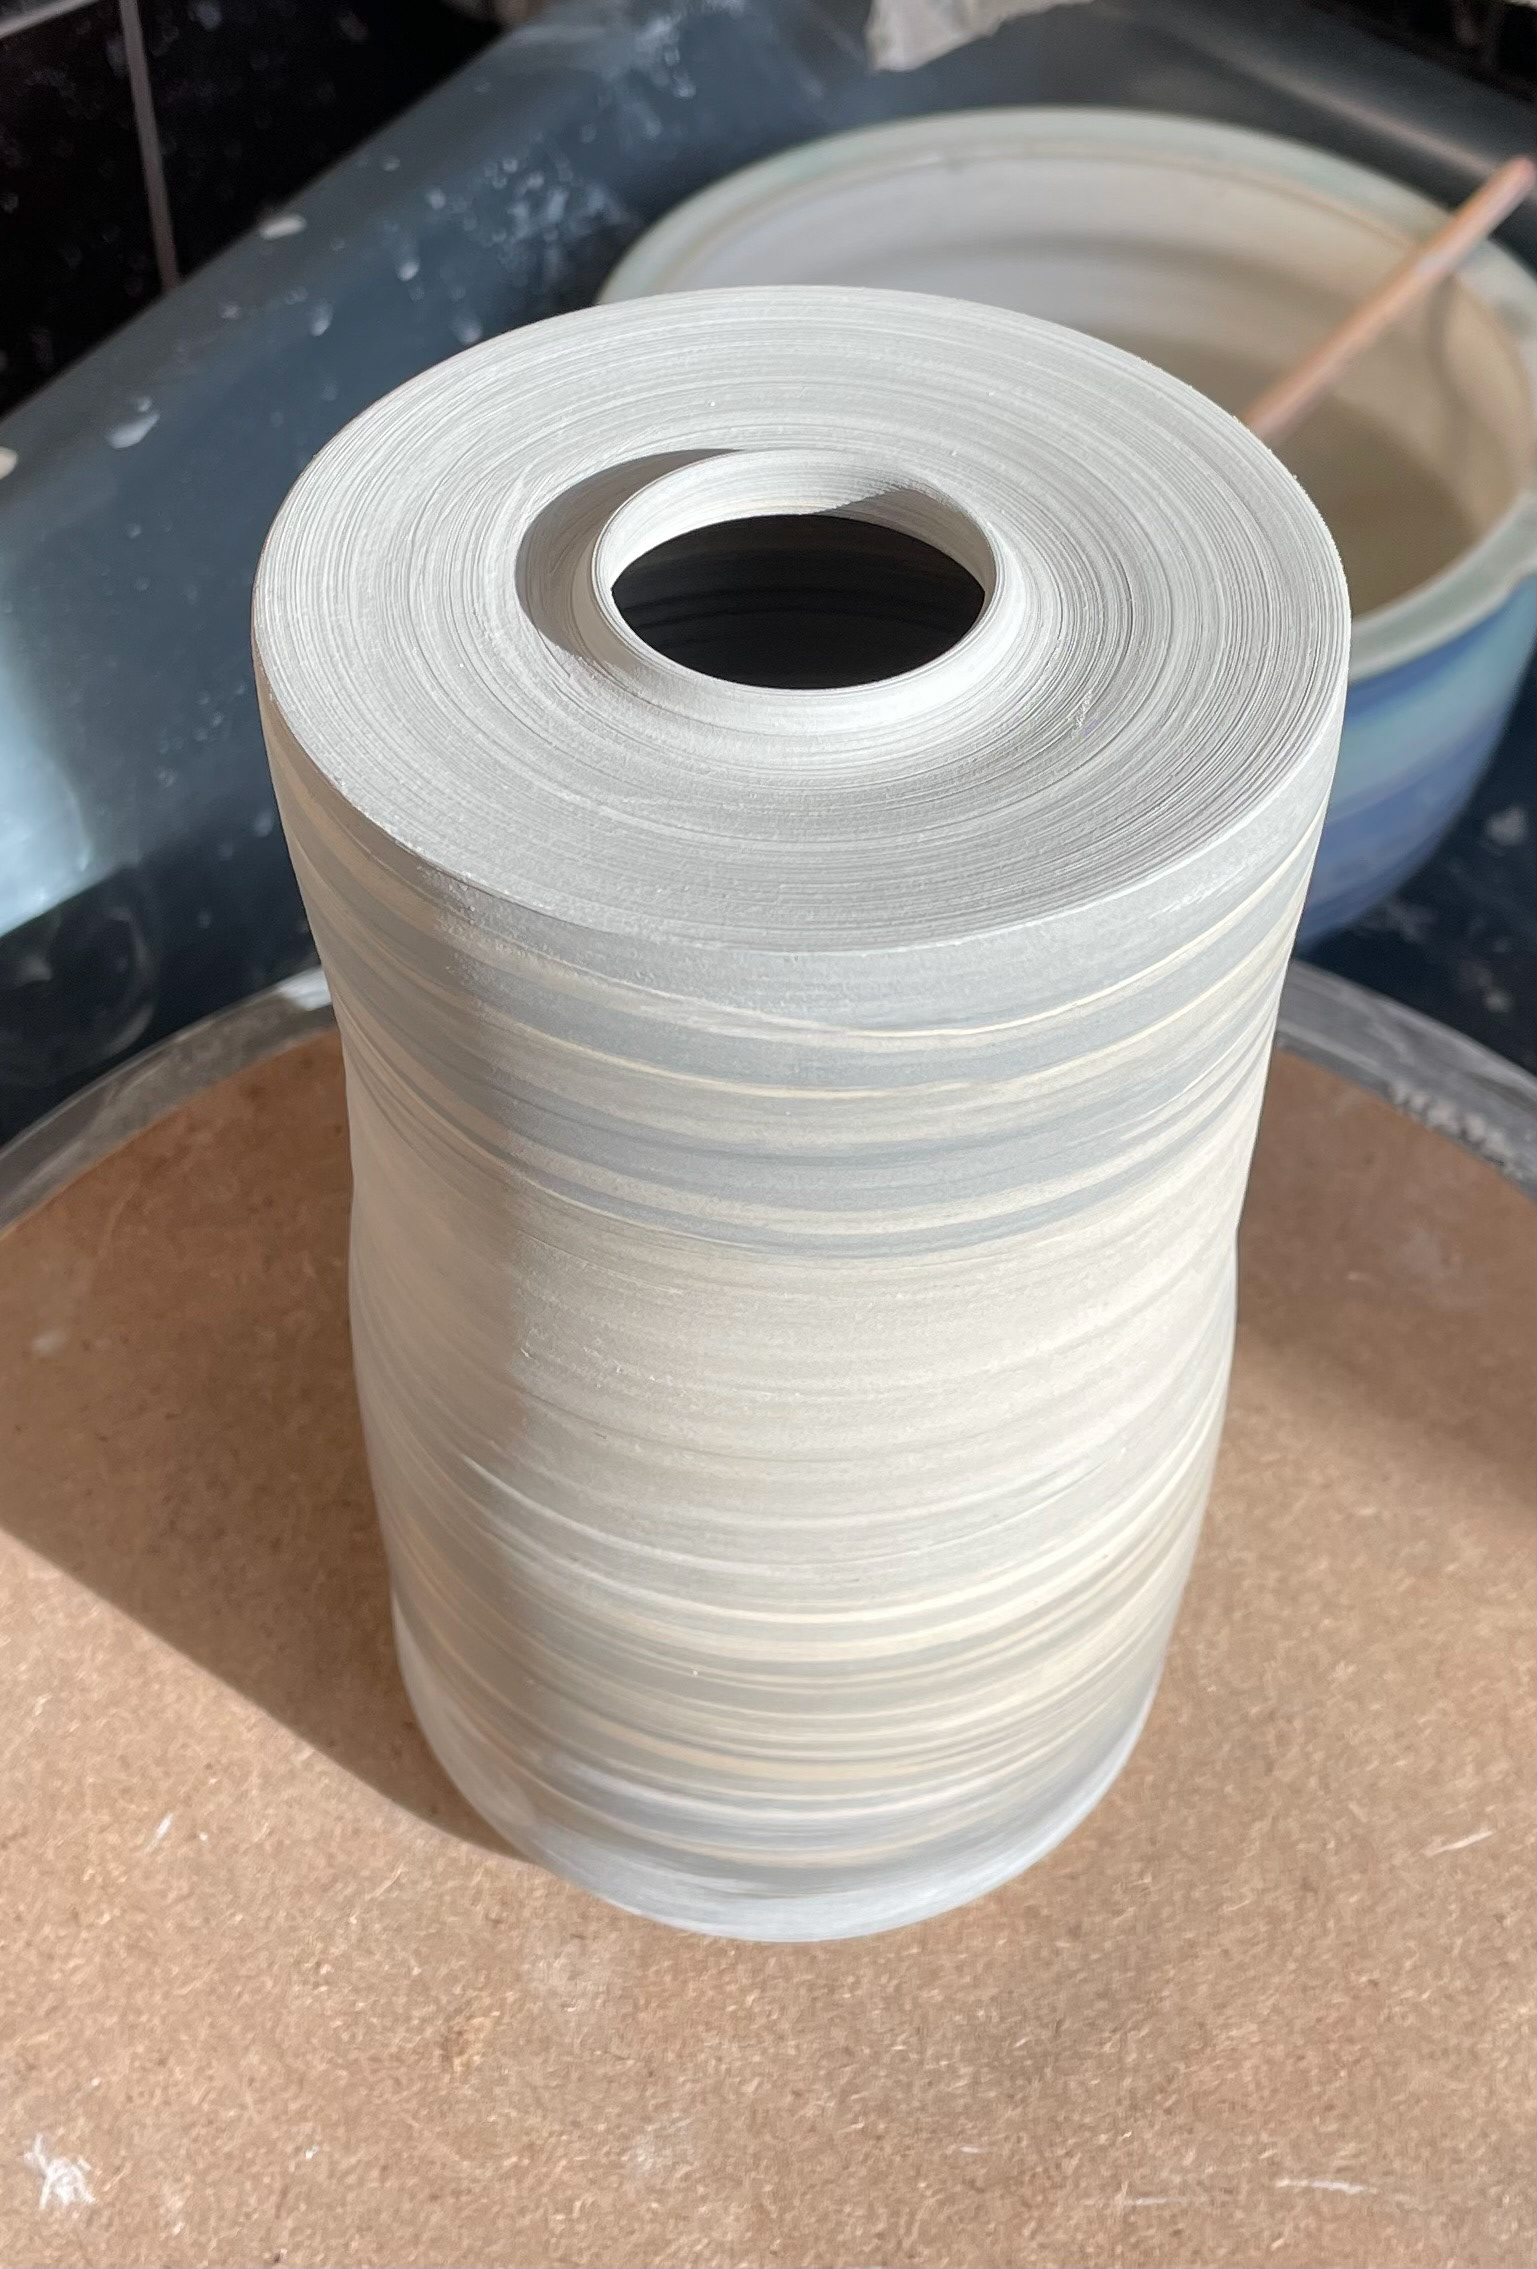
Using 500g of coloured clay, I decided to utilise the leftover grey clay to create marbled mixed vessels with 500g of ivory stoneware. These vessels are thrown with 1000g of clay but split into two parts, making them much larger than my previous samples. I wanted to explore different sizes with these pieces, so I made some wider and shorter and others tall and skinny.
I minimised my wedging to create chunky lines of marbling throughout the vessels. It was interesting to see how each vessel had different marbling patterns and how these patterns connected when the parts were joined together. With my darkest grey clay, the marbling was much denser because it took longer to centre the clay, resulting in more thorough mixing. However, this also created a clean blend at the attachment points.
My vessels have naturally developed a slight indent at the tops before the opening. This was an unintentional form that emerged from pulling up the rim opening. I like the effect it gives, but I need to be careful not to make the indent too deep, as it would detract from the sleek look I intend to achieve.


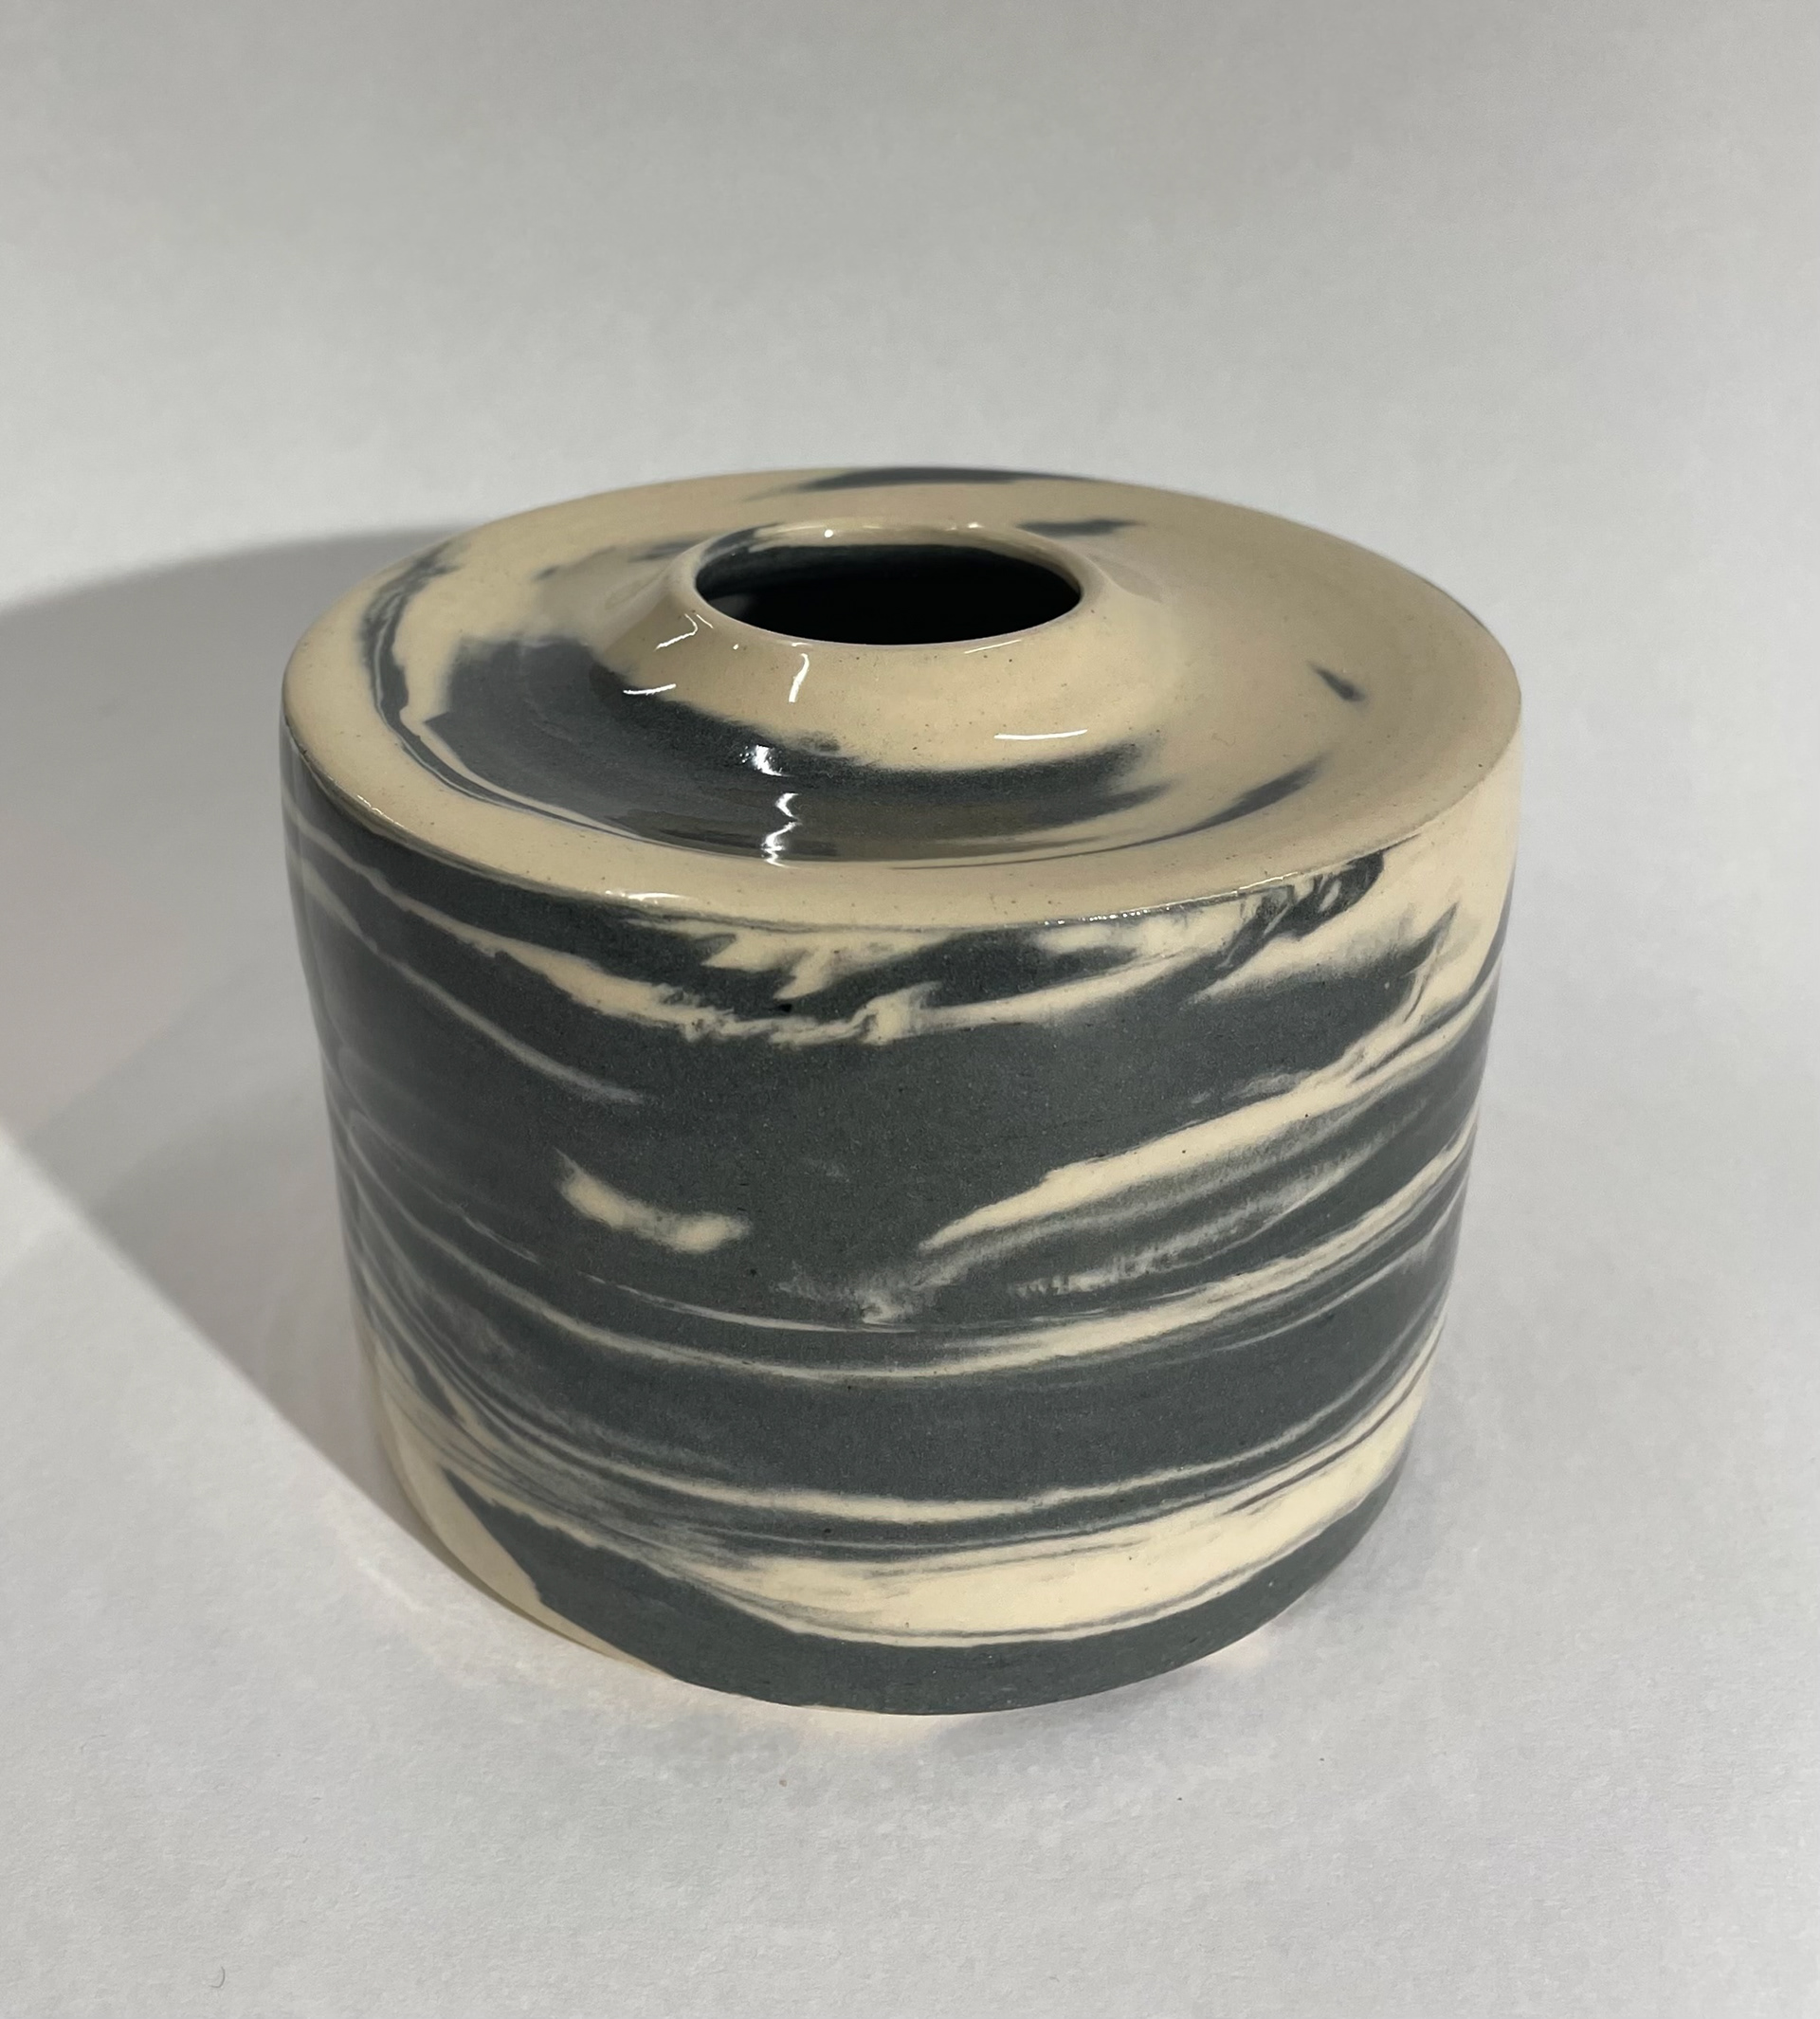
When looking at these outcomes, I find it interesting that the same amount of coloured clay created such a variety in my marbled finish, some being fully covered by grey and the others having more white clay visible. This is one of the reasons I love throwing with marbled clay, as you have no control over the results.
Upon reviewing the pots, I noticed that the different sizes of openings on my vessels highlighted an important aspect of design. Some openings do not complement the vessel's shape, particularly when the opening is too large, as it detracts from the delicate, simplistic look I aim for. I much prefer a smaller vessel opening, as it appears more sleek and delicate.
I realise I need to experiment with different sizes of openings and observe their effects on various vessel shapes. Additionally, I need to decide whether I want all my pieces to have uniform openings or if I should embrace inconsistency within the collection
I created these pieces to evaluate sizing and practice throwing these vessel shapes. While the thrown pieces are a good size, being easy and comfortable to hold. From these pieces, I realise I need to continue developing my work as I am not fully satisfied with them. The quality is not yet at the level I want for my final pieces.
Although I used grey for my coloured pieces to test the recipe, I realised that grey and natural stoneware are too muted and don't follow the flow of colour throughout my vessels. I want to include grey clay, but as a tinting colour, adding small amounts to allow the coloured clay to pop more.
Reflecting on these pieces, I decided to further explore my glazing techniques. Since I didn't glaze the base, it retains the raw fired clay, which has a very smooth finish. I believe it's a shame that this feature isn't more prominent in my work. I want to develop my glazing methods to enhance the natural clay features, making them a more significant aspect of the pieces. This is an area I will continue to develop.
Red Clay


Exploring red clay, I wanted to experiment with different amounts of stains to see what amount gave me my ideal colour. I created different mixtures:
Cherry Stain- 1st picture
-5% -10% -15%
Poppy Stain- 2nd picture
-5% -10% -15%
Deep Salmon- 3rd picture
-5% -10% -15%
I made two different cones with each mixture to see if they reacted better in stoneware or earthenware firing.


I experimented using stains to colour my clay, as I had previously only worked with oxides. Since red is a temperamental colour, I chose stains as the safest option. At varying percentages, I tested three different stains- Poppy, Cherry, and Deep Salmon- to determine the best saturation level for achieving the desired hue. Additionally, I fired these samples at both earthenware and stoneware temperatures to see if a higher temperature produced better results.
Earthenware and stoneware temperatures to determine if a higher temperature would yield better results.
While stoneware firing typically enhances colour when using stains, it does not perform well with oxides. The higher temperature negatively affects the clay body, making it unsuitable for my vessels, which will incorporate multiple oxide-coloured clays. Consequently, I concluded that these stains must be fired at earthenware temperatures to ensure compatibility with my process.
Although Poppy and Cherry stains were quite similar, Poppy produced a richer red. In both cases, the highest percentage of stain resulted in the boldest, most vibrant colour. However, the Deep Salmon stain, which wasWhile stoneware firing typically enhances colour when using stains, it does not work well with oxides. The higher temperature negatively impacts the clay body, making it unsuitable for my vessels, which will incorporate multiple oxide-coloured clays. As a result, I concluded that these stains must be fired at earthenware temperatures to ensure compatibility with my process.
The biggest challenge with stains is their cost. Since I need 10–15% stain to achieve my desired clay colouration, this significantly increases expenses, making it difficult to use stains extensively. Given this, I am satisfied with the results of Poppy and Cherry but will continue experimenting using oxides, as they keep production costs lower. Moving forward, I need to conserve the stains I have for my final pieces
Professional Finish- The Quality of My Ceramics
Quality Control


Looking at my fired vessels, I realise I need to improve my quality control. Even though these are test vessels, they must maintain a high standard of finish. Through these pieces, I've identified areas for improvement and specific aspects to focus on for my final vessels.
One key area to improve is my working environment. Ensuring my clay is properly processed, including sieving it, using new clean sponges, and keeping my wheel fully clean, will help prevent tiny pebbles and debris from mixing in and damaging the surfaces of my vessels. Although these tiny pebbles can sometimes be missed, maintaining a controlled environment is crucial for achieving high-quality final pieces.
Another quality control aspect is the edges of my base ribs. I want to make these very sharp and consistent throughout my work, enhancing their professionalism and unique individuality. Creating a rib specifically for this purpose will significantly improve my finishes, resulting in cleaner and sharper edges that are consistent in size and angle across all my vessels.
Additionally, trimming and refining the openings of my vessels to ensure they are consistent, with clean trimming lines and smooth finishes, is essential. This attention to detail will elevate the overall quality and professionalism of my work.


Creating A Rib
In my previous unit, I used found pebbles from the beach to shape my vessel profiles, essentially using them as ribs. For this project, I knew I wanted to create a rib to ensure all the angled bases were uniform. However, I opted for a straight-edged rib rather than a pebble-shaped one. While I appreciated the organic form in my previous project, that collection consisted of only three vessels, allowing me to use different pebbles for each. With this new collection of thirty vessels, which already vary in size and form, incorporating individual pebble rib profiles would introduce too much visual complexity.
Repeating the pebble rib concept would make this project feel too similar to my previous work. When reflecting on that earlier project, I realise it was primarily centred around Brighton Beach. However, as this project has evolved, so have my intentions. My focus is no longer on Brighton Beach and its physical elements but rather on the broader theme of home and my personal journey of moving between places.
For these reasons, I have decided not to continue using pebble ribs to shape my vessel profiles. Instead, I have found that my work naturally develops its own profile through the joining process, where the widths and heights of the pots dictate the final form. This organic approach results in individual profiles that feel more intuitive and visually cohesive, making them a better fit for the direction of this project.
I refined my rib designs in Photoshop, experimenting with various sizes and angles to determine the best outcome for my vessels. I decided to test the middle option first, as its sharp angle would create a bold statement in my rim design. This choice strengthens the unity of my collection, ensuring a cohesive and intentional aesthetic.
After sketching several sizes, I concluded that a rib measuring 16cm in length and 4cm in width would be ideal. I selected plywood for its durability, though in hindsight, a thinner wood might have been preferable. However, since I’ll be using the rib at an angle, the thickness won’t significantly impact the final result.


When I use a rib to cut angles in my vessels, it becomes an essential tool for achieving precision and consistency. By shaping the bases with a uniform angle, I ensure that each piece maintains a cohesive form across the collection. The straight-edged rib allows me to create sharp, clean cuts that would be difficult to achieve by hand alone. I find that using this rib streamlines my process, preventing uneven transitions and making it easier to replicate the same angular profile on multiple vessels. Additionally, it gives me more control over the structural integrity of my work, ensuring that the angled base supports the overall form rather than disrupting it. Without this tool, maintaining uniformity across my collection would be far more challenging, especially when working with varied vessel sizes and shapes. As I continue refining my designs, this rib remains crucial in helping me develop strong, intentional profiles.
Using A Rib

When using the rib, it created a nice rim. However, its width caused it to extend too far along the length of the vessel and go too deep into the base. This weakened the walls by carving away too much of the base structure, making it fragile. As a result, when I tried to wire it off the wheel, it cut through right where the rib ended. Although my base was thick enough to handle the process, the rib's excessive width removed too much material, leading to a weaker structure. This caused the walls to collapse and the base to come off completely.
To address this, I need to recut a new rib with measurements that are not as wide, ensuring it doesn't damage the base while still creating a clear, defined rim. The failure might also be attributed to this being one of the wider vessels I threw, as the rib worked perfectly on my longer vessel. The surface area of the vessels likely played a role in the outcome.

To ensure all my ribs are consistent, I need to further develop the design, considering the angle and depth. Although the current rib looks good on taller vessels and works successfully with shorter ones, it is too large, making the rim the focal point. Therefore, I need to create a rib with an angle and depth that suits all sizes of my vessels. I plan to make the rib shorter in width to avoid trimming too much off the base and slightly reduce the angle so it works well with all my vessels.
Creating A Stamp
I collaborated with Kate to create a 3d-printed stamp. I wanted a stamp for my vessels to distinctly mark and sign my work. Previously, I would scratch my initials into leather-hard clay, but this didn't provide the clean finish I desired. Therefore, I asked Kate Quinsee, who has experience with 3d printing software, to help me create a stamp. I wrote my name out, and she transformed it into a stamp.


I am very pleased with this stamp and love the finish it gives to my work. Using my handwriting instead of a generic font adds a more personal touch and a sense of care and hard work to my vessels. The challenge with this stamp is applying it to the bases of my vessels, as it requires a lot of pressure and a flat surface to engrave clearly. In the picture on the left, you can see that simply pressing it onto the base didn't engrave it as clearly because I didn't have anything to push against.
I placed a plasterboard inside my vessel before attaching it for the next stamp. This provided extra support to push firmly, resulting in a clear stamp of my name. I will continue to use this technique on my vessels.


I prefer this stamp method to carving my initials as it brands my vessels and gives a more professional finish. These stamps i pushed to hard into the clay, the stamps don't need to much pressure on them for my name to be stamped and readable, by having really deep stamp marking it can lead to the base cracking and also doesn't look like a nice finish, i want my vessels to be consistent and this includes the stamping on the base, being able to mark my name with out damaging the look and vessel. I think they will be further enhanced with a nicer trim on the base of the vessels that frames the stamp. This will also help me get it centred and give it a clean finish. To develop this, I was thinking of slipping the base as it will help with reading it better, as it's harder to read on a darker, more marbled base.
Slip The Base
I experimented with applying a white slip to the base of my vessels, hoping to add consistency and improve the stamping of my branding and QR codes. Although this was a lengthy process due to the need for multiple layers, especially on darker bases, I found it worthwhile. Each application required drying time, and I used a hair dryer to speed up the process. However, I had to be careful with the amount of heat applied to avoid cracks.
Once all the layers were applied, I was able to push my stamp in. The white base significantly enhanced the professionalism of my work, improving its visual appeal, especially when displayed as a collection. It also made the QR code stamp easier to read against the plain white background, which would also be beneficial for black transfers.


Despite the time-consuming nature of this process, I want to see how the vessels develop after firing and glazing to determine if the white slip makes a significant difference. If it doesn't fire well, it may not be efficient to include this step in my process.
To apply the slip efficiently, I attached my vessel to the wheel. Once trimmed, I added the white slip with a brush, allowing each layer to dry before applying another. I did this while my vessels were in separate parts to enable stamping and applying my QR code, as I needed an open vessel to apply the right amount of pressure.
I believe that having white bases enhances the visual appeal of the collection. However, I want to see how they look once fired and with different applications of glazes. I am curious to observe whether the slip changes and separates the base from the body of the vessel or if it results in a more professional, finished look.
The texture and surface finish of the slip can be altered by the firing process. High temperatures can cause the slip to vitrify, creating a smooth, glass-like surface. Conversely, lower temperatures may result in a more matte or rough texture. The slip and the clay body may shrink at different rates during firing, which can cause cracking or peeling of the slip. Proper matching of the slip and clay body is essential to minimise these issues.
Oxide Stain


When examining my bisque-fired pieces with a stamped maker's mark on a white slip base, I was pleased with the results but found that the mark was difficult to read due to the white-on-white effect. To enhance visibility, I experimented with copper oxide, which fires to a near-black colour. Using a sponge, I carefully applied the oxide into the stamped indentations, allowing it to sit for a few minutes before wiping away any excess with a clean sponge. This process left the oxide concentrated within the recessed areas, effectively filling out my name.
However, I encountered some challenges. My stamp had not been pressed evenly, resulting in variations in depth, certain areas were raised more than others. As a result, when I attempted to wipe away the excess oxide, it removed too much from the shallower parts, particularly at the beginning of my name. To improve this, I need to practice applying consistent pressure when stamping to ensure uniform depth.
Additionally, applying the oxide was tricky due to the fine lines of my maker’s mark. Getting the oxide precisely into the grooves was difficult, and when it overflowed onto the surface, it was challenging to remove without smearing. I had to repeat the process multiple times to achieve the desired outcome. Hopefully, any remaining smudges will not affect the final appearance of the white base.

The final result was far from what I expected. In some areas, the oxide didn’t adhere at all, while in others, there was too much, causing it to burn out and create a glowing effect. This method turned out to be messy and time-consuming, and with my maker’s mark being so fine, the outcome looked inconsistent and unprofessional. I can already anticipate the difficulties of applying this across a large collection of vessels, as achieving uniformity would be nearly impossible.
Additionally, having both the stamp and QR code feels distracting and takes away from the delicate nature of my pieces. Given these challenges, I now want to experiment with transfers to achieve a cleaner, sharper maker’s mark that enhances rather than disrupts the overall aesthetic of my work.
Sample Vessels
I created vessels to use as samples and to practice my quality control techniques. For these vessels, I used a combination of 0.5%, 1.5% cobalt, and ivory stoneware. To get the sizing right, I increased the amount of clay, using 1000g of clay for each vessel and throwing with 500g of clay for each part. This allowed me to achieve the desired dimensions, with the slimmer vessel being 16cm tall and the wider one being 17cm wide. Once they are fully fired, I hope they will only reduce by about 1.5cm, making them a suitable size for my pieces.
I also used these vessels to experiment with my quality control methods. I tried using a rib to get consistent base rims, but the angle of the rib was too big and deep, removing too much of the base. To address this, I plan to redesign my ribs, making them smaller to achieve the desired consistency. Additionally, I experimented with my stamps and QR codes on the base. These worked well, but I still want to explore different transfer techniques.
Furthermore, I plan to use these vessels to practice various glazing techniques and observe how different glazing applications affect the final appearance of the vessels.


These were my most successful samples, as they matched the ideal sizing I want for my final pieces. Through this process, I was able to practice joining the vessels and refining the openings, allowing me to test different techniques. I found that cutting open the circle and then pulling up for the wall resulted in the best openings, giving me greater control over the form.
These vessels provided valuable practice, helping me identify the aspects I need to focus on moving forward. Based on these tests, I’ve determined that throwing with 1000g of clay is the right approach to continue with, ensuring consistency in my final pieces.


Developing Glaze Finish


Glazes add colour, texture, and shine to ceramic pieces, enhancing their visual appeal with a wide range of finishes, from glossy to matte. They form a glass-like coating that makes ceramics more durable and resistant to scratches, stains, and moisture, which is especially important for functional items. The smooth, non-porous surface created by glazing makes ceramics easier to clean and more hygienic, as it prevents the absorption of liquids and bacteria. Additionally, glazing can increase the strength of ceramic pieces by sealing the surface and reducing the risk of cracks.

Looking into my glazes, you can see a significant contrast between the non-glazed and glazed parts. By applying glaze, the colours become much more vibrant, giving the pieces a glossy finish. I originally liked this finish as it reflected the ripples in the sea and the shiny glass buildings in the city, enhancing the colours. Therefore, I glazed the entire body of my vessels.
However, upon reflection, I really appreciate the exposed fired surface for its more natural look. The smooth finish reminds me of the smooth stones on Brighton Beach and the exposed red bricks of the city. For this reason, I want to experiment with my glazes, trying contrasting half glazes to mix both glossy and natural finishes.
As I’m creating a collection, I can always experiment with different glazes, each vessel having a different individual glaze finish. some being completely bare, while others have half to fully glazed bodies. Since my marbled pieces are so dominant in the style, ¡ can easily play around with glazes without losing their connection to each other as a collection.
I need to remember that I want my vessels to be fully functional as I'm giving them away to the public without instructions on how they can be used. Therefore, I need to fully glaze the inside of my vessels to enhance their functionality. However, only glazing the inside can lead to difficulties when firing one side of a vessel and leaving the outer surface exposed can cause damage and cracks due to the glazing temperatures. To address this, I will need to conduct further experiments to see if this will damage.

No Glaze

Split Glaze

Split Glaze
Full Glaze
I experimented with different glaze finishes to determine which worked best for my vessels: no glaze, split glaze, and full-body glaze.
For the first vessel (1st photo), I left the outside unglazed but applied glaze to the interior. While I appreciated the natural texture, I found it disappointing not to use glaze to enhance the boldness of the colours. The white and dark blue clay lacked vibrancy, which felt like a missed opportunity. Additionally, I was not satisfied with the transition at the opening, where the glazed rim abruptly met the unglazed surface. This contrast did not create a visually pleasing effect, and I could have executed it more neatly.
For the next two vessels, I tested split glazing. I dipped them into a glaze bucket and cleaned up the edges to form a clear division. In my first attempt (2nd photo), I applied the glaze too thickly, creating a raised line around the vessel that resembled an unintended rim. The excessive thickness also led to bubbles and inconsistencies, making the piece appear poorly finished. Additionally, placing the split line in the middle made it look like two separate pots joined together, which was not my intent.
Since the first split glaze vessel did not turn out as expected, I tried again (3rd photo). This time, the result was much closer to my vision. The glaze enhanced the colours while still showcasing the natural clay. The half-glazed approach expanded my colour palette, allowing muted tones to blend into vibrant hues. This effect complements my concept of merging elements from both cities, Manchester’s industrial shine in the glazed areas and Brighton’s organic, earthy quality in the unglazed sections. Though the dipped line was uneven, I did not mind this, as it followed the flow of the marbled clay. However, maintaining this effect across all 30 vessels might be challenging.
For the final vessel (4th photo), I applied a full-body glaze. While I liked the finish, I now feel that the split glaze adds a unique depth. It not only enhances the piece visually but also reflects greater skill and thought behind the glazing process.
Considering the collection as a whole, I believe consistency in glazing is necessary. If some vessels are glazed and others are not, the colours may not flow harmoniously. Since glaze significantly enhances the clay’s vibrancy, contrasting bold and muted tones across different pieces might feel disjointed. My preference is the split glaze, it extends my colour palette and reinforces my theme of combining two cities into one vessel. The glossy, glazed sections embody Manchester’s industrial feel, while the unglazed areas reflect the natural essence of Brighton, reminiscent of its beach pebbles and their tactile, comforting quality.
I may explore varying the split glaze levels on each vessel, introducing different glaze lines for a playful effect. Further testing will be necessary to determine whether this approach is viable. Additionally, I need to consider how a split glaze interacts with my horizon line concept. Will the two elements complement each other or create visual conflict? As I progress, I will refer back to these vessels to ensure I make the right decision.
Horizons


Brighton

Motorway

Manchester

Photoshop Edit Drawing
Reflecting on my photos and scanned drawings, the sun's horizon is present in all the pictures. I find it interesting how this one horizon is present in all the locations I go to and doesn't change at all. This split within the sky is always present, only its surroundings change. In Brighton, the horizon is split with the sea, with Manchester, it's split with the city. This orange line within the sky is something I want to explore in my work. Incorporating this line throughout my vessels, I think, could elevate their distinction and journey.


I explored two methods to incorporate horizon lines into my work. The first involved painting an orange slip directly onto the surface before bisque firing, using the wheel to achieve a precise, straight line. However, I found this method quite challenging, as multiple layers were required to achieve an even, consistent application. Maintaining uniformity across the layers and ensuring the line remained in the same position proved difficult.
For my second method, I applied an orange underglaze after bisque firing. To ensure clean edges and even layering, I sectioned off the area with tape. I conducted two tests: in the first, I applied three layers of orange underglaze. In the second, I painted two layers of white underglaze first, allowing it to dry before adding two layers of orange on top. The goal was to determine whether a solid white base would enhance the vibrancy of the orange.
In the first method, I noticed the orange appeared patchy due to the marbled clay beneath it, particularly where the dark blue under muted the orange’s intensity. The second method resulted in similar patchiness, and when I removed the tape, it chipped away parts of the orange. Additionally, the white underglaze caused further chipping, revealing uneven edges that I found unsatisfactory.
Ultimately, both methods had problems and failed to meet my standards. The orange alone was inconsistent in coverage, while the combination of white and orange resulted in messy, imperfect lines. Moreover, the multiple layers required for both techniques created a raised texture that disrupted the smooth, comfortable surfaces of the vessels. The prominence of the orange lines detracted from the overall form, making them feel intrusive rather than integrated.
Given these results, I have decided not to continue using orange slip and underglaze and will explore alternative methods for incorporating horizon lines. One potential approach is experimenting with transfers to achieve a smooth, clean line around each vessel.


Transfers
I decided to use transfers for my QR code and maker’s stamp on the base of my vessels. Transfers allow for a much cleaner, more precise QR code, enhancing the professionalism and refinement of my work. I previously experimented with stamps, but the inconsistencies in their application compromised the overall finish. By using transfers, I aim to achieve sharp, readable lines, especially crucial for QR codes.
This method does require an additional third firing. However, since the firing temperature is relatively low at 750°C, it will not affect the integrity of my coloured clay. To successfully apply the transfers, I need to ensure that the bases of my vessels have a deep enough foot, allowing me to glaze the base and create a smooth surface for easy application.


I used spare transfers to practice application, testing them on two different surfaces, one fully glazed and the other a bare tile. Both applications were straightforward, and I didn’t notice much difference between applying transfers on a glazed versus an unglazed surface. This may be because the unglazed tile had a very smooth finish, allowing the adhesive to work just as effectively. I activated the transfers using lukewarm water, then carefully pressed out any air bubbles with a rubber kidney to ensure they adhered properly. Once satisfied with the placement, I let them dry before firing them in the kiln.
To my surprise, when the tiles came out of the kiln, the transfers had completely disappeared, leaving only dust behind. At first, I suspected the firing temperature might have been too high, but upon further inspection, I realised I had unknowingly used underglaze transfers. Since these require a different firing process, they burned off entirely in the kiln.
Although this experiment didn’t produce an outcome, I was pleased with my application technique and gained valuable practice. Moving forward, I will design and print proper transfers that are intended to fire at 750°C. Despite the unexpected result, this trial helped refine my transfer application process, which will be beneficial for future work.


I decided to redo this process since I couldn’t assess the final results of my previous tests, meaning I had no way of knowing if my application technique was correct. For these transfers, I edited my QR code and name in Photoshop, as it was important to see how well they would transfer and whether the QR code would remain scannable after firing. Once finalised, Diane and I printed them, which was a straightforward process.
I applied the transfers to a glazed tile, as I plan to glaze the base of my vessels. The application was simple, using warm water to activate the adhesive and a rubber kidney to smooth out air bubbles and ensure proper adhesion. I’m excited to see how they turn out, particularly how vibrant the black appears after firing, as it looks slightly muted at this stage.


I'm really pleased with the results of my transfers. The application process was straightforward, and the outcomes were consistently clean and professional. This clarity is especially important as it ensures that both my maker's mark and the QR code are easily scannable and visually precise.
Initially, I had some concerns about using high-gloss transfers, particularly due to the potential for a slight yellow halo effect around the edges, as noted by Rudi. However, I was pleasantly surprised to find that this issue did not occur. The transfers adhered smoothly without any discolouration, maintaining a crisp edge and a high-quality finish.
Thanks to the clean application and excellent legibility, I’ve decided to incorporate this transfer method into my final pieces. Moving forward, I will focus on refining the scale of the transfers to better suit the base dimensions of my vessels. This will ensure that the design remains balanced and proportionate while preserving the clarity and impact of the maker’s mark and QR code.
Reflecting On My Making
Throughout my making process, I focused on perfecting previously learned techniques such as throwing and joining, aiming to refine my craftsmanship to the highest level. While I had experience with these methods in past projects, I wanted to push my precision further, enhancing the aesthetic quality of my vessels and ensuring structural integrity, minimising the risk of cracks. Alongside refining familiar techniques, I also explored new processes, including QR code transfers, which required careful decision-making to determine the most effective methods for my work.
Although I found the process challenging, the constant cycle of learning and adjusting was essential for me to fully understand my work beyond just making it- it shaped how my vessels interact with the audience and how they emotionally resonate within a space. This experience reinforced how material testing directly informs artistic intent, allowing me to refine what I truly want to achieve. Initially, my progress felt slow, but this period of deliberation and detailed focus allowed me to develop the subtle elements that define and elevate my work. By taking the time to consider form, texture, and interaction, I made deliberate choices that strengthen the emotional connection between my vessels and their viewers.
I entered this project with set ideas about what I wanted to explore, but the unpredictable nature of making, where certain processes didn’t work or required adaptation, forced me to expand my knowledge and craftsmanship in ways I hadn’t anticipated. Embracing these moments of uncertainty allowed me to experiment and refine, ensuring each decision was made with purpose rather than defaulting to pre-existing assumptions. Moving forward with my final piece, I still have decisions to make, but this process has provided a strong foundation for that development. I have learned that trusting myself as a maker is key, knowing that when faced with uncertainty, I can remain calm, problem-solve, and adapt rather than feel constrained by initial ideas. This experience has reshaped my approach to making, reinforcing that simplicity and refinement often create more impactful work than excess complexity.